A show-stopping balloon arch may never come into being if helmed by specialty helium tanks and all. Whatever it may be-birthday party, wedding, honeymoon anniversary-just about any soiree would be an excellent occasion for you to go full steam ahead with a DIY balloon arch! This tutorial will show you how to generate a striking balloon arch using easy materials and absolutely no helium. Step by step, we’ll guide you through the process and provide expert tips on budgeting, creative design ideas, and everything you need to get started. By then, you should have a heavenly work of art all set to grace the occasion as a showpiece, and all done from home!
Understanding Balloon Arches
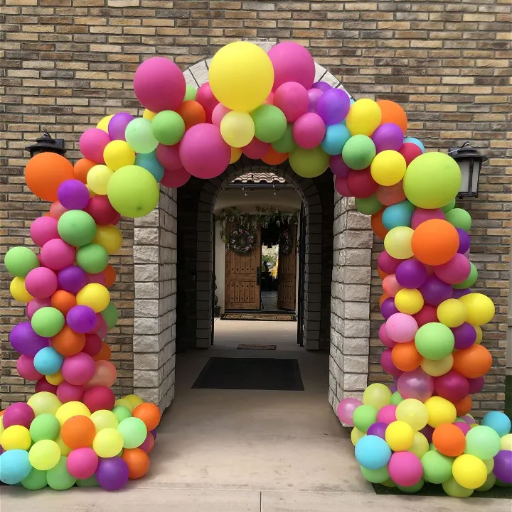
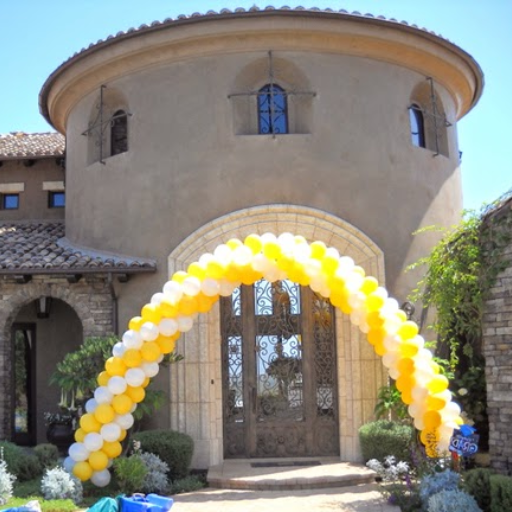
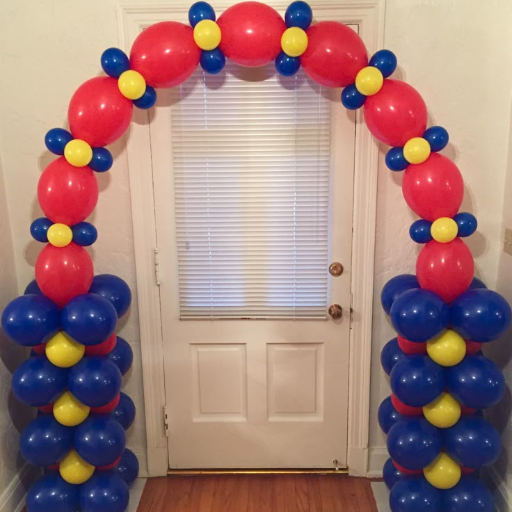
Silken arches are picturesque columns into which balloons are set in a curved or arduous semicircular formation. They are typically used as an adornment at functions such as weddings, parties, or grand openings. Usually, a balloon arch is built on a frame that serves as its skeleton; this skeleton upholds the balloons and maintains the desired shape. The balloons are clustered and arranged in a manner that gives the shape a plump and gorgeous look. There are endless possibilities for colors, patterns, or themes that can go into making these fantastic shapes suitable for any occasion.
What is a Balloon Arch?
An enticing decoration is a balloon arch, created by arranging colored, inflated balloons on a frame to form an arched structure that can be customized according to various occasions, including weddings, parties, and corporate openings.
Benefits of Using Balloon Arches for Decorations
|
Key Point |
Description |
|---|---|
|
Customizable Design |
Tailored to match themes, colors, and branding. |
|
Creates Visual Impact |
Eye-catching centerpiece for any event. |
|
Enhances Guest Experience |
Welcomes guests and creates a festive atmosphere. |
|
Photo Opportunities |
Serves as a perfect backdrop for memorable photos. |
|
Cost-Effective |
Affordable compared to other decorative options. |
|
Versatile Usage |
Suitable for various events and venues. |
|
Professional Appeal |
Adds elegance and professionalism to corporate events. |
|
Durable and Secure |
Fixed installations ensure stability and longevity. |
|
Eco-Friendly Options |
Biodegradable materials are available for sustainable events. |
|
Saves Time and Effort |
Professional services handle design, setup, and installation. |
Why Choose to Make a Balloon Arch Without Helium?
Making a balloon arch without the use of helium certainly presents a practical and cost-efficient solution for event decorations. Helium, while sought for floating balloons, may fetch a hefty price, and depending on its availability, it can often prove challenging to find. The downside, too, is that helium balloons do not last long, as the slow leakage of the gas causes them to deflate quickly. In contrast, a balloon arch without helium, made with air-filled balloons on a robust frame, can last for any number of days or even weeks, making it the perfect choice for lengthy events or when the decoration needs to be set up a few days ahead of time.
From an environmentally conscious standpoint, another reason weighs against the use of helium. Being scarce and non-renewable, helium has several significant uses in medical and scientific fields, including MRI machines. Using air-filled balloons conserves that helium for such critical areas while also minimizing waste. Helium balloons are more common and, in the event of an accidental release, are likely to cause significant damage to wildlife.
A notable feature that should be given credence is the ease with which a DIY enthusiast can create an arch without helium. Inexpensive tools to include: balloon pumps or electric inflators. These simply make the job easier. Attaching air balloons to the frame can be done with tape, fishing wire, or balloon rings, providing you with plenty of options and allowing you to rearrange as needed. Additionally, this offers good flexibility in terms of location, as there is no concern about the balloons flying off.
Utilizing air-filled balloons saves money and creates a more eco-conscious and long-lasting decoration suitable for the new generation.
Materials Needed for a DIY Balloon Arch Without Helium
- Balloons (various sizes and colors as desired)
- Balloon Pump (to inflate the balloons)
- Balloon Tape or Decorating Strip (to place the balloon)
- Fishing Wire or String (to give extra support)
- Tape or Adhesive Hooks (to attach the arch to surfaces)
- Scissors (for cutting tape or string)
Types of Balloons Suitable for Balloon Arch
|
Type of Balloon |
Description |
|---|---|
|
Latex Balloons |
Affordable, versatile, available in many colors. |
|
Durable, shiny, and great for custom designs. |
|
|
Biodegradable Balloons |
Eco-friendly option for sustainable events. |
|
Double-Stuffed Balloons |
Custom colors are created by layering two balloons. |
|
Metallic Balloons |
Adds a chic and elegant touch. |
|
Printed Balloons |
Custom logos or patterns for branding. |
|
Mini Balloons |
Used for intricate details and accents. |
|
Large Balloons |
Creates a dramatic and bold visual impact. |
|
Glow-in-the-Dark Balloons |
Perfect for evening or themed events. |
|
Themed Balloons |
Shapes and designs matching event themes. |
Tools and Accessories Required
The necessary tools and accessories for a sturdy and beautiful balloon arch are as follows.
- Balloon Pump
The balloon pump is a must-have to inflate multiple balloons quickly and effortlessly. For smaller projects, a simple hand pump is a suitable option. Meanwhile, any larger setup will significantly benefit from the time and effort saved by the electric balloon pump.
- Balloon Tape or Decorating Strip
Balloon tape (often made of plastic with pre-cut holes) makes the entire process of attaching and securing balloons easy for an arch. It provides a neat and orderly structure for positioning balloons in various patterns.
- Fishing Wire or String
Fishing wire is a great option to reinforce the stability of your arch. Being sturdy yet see-through means it supports the structure without visually detracting from it. It comes most handy when suspending the arch or fastening it onto walls or other surfaces.
- Adhesive Hooks or Command Strips
Adhesive hooks or command strips are designed for securing balloon arches to walls, door frames, or ceilings without damaging these surfaces. Choose hooks that can support the weight of your arch (e.g., 2-5 lbs load capacity) based on the size and weight of your arch.
- Scissors
These are used for cutting string, balloon tape, or adhesive strips. Ensure you use very sharp and precise ones for optimal results.
- Glue Dots or Low-Temperature Glue Gun
Glue dots are tiny circles filled with adhesive; they are used to securely attach smaller balloons or decorative items to specific areas of the arch. Alternatively, a low-temperature glue gun can come in handy, but with caution so as not to ruin your balloons.
- Weighing Materials (Optional)
You may also need some small weights or sandbags to keep your arch in place, especially for outdoor installations where wind and other factors might jeopardize its stability.
These tools guarantee that your DIY balloon arch is a joy to make, safe to use, stylish, and stands the test of time.
Choosing the Right Location for Your Arch
Selecting the appropriate spot for my balloon arch is primarily contingent on ensuring that the location complements the event’s layout and theme. I evaluate potential venues having sufficient space for the arch, while factors considered include visibility and lighting, which are scored to set the arch apart. Being outdoors means observing weather changes and anchoring the arch securely so that nothing interferes with it. Thus, from these considerations, I select a particular spot that better enhances the feel of the event.
Step-by-Step Guide to Making a Balloon Arch Without Helium
|
Step |
Description |
|---|---|
|
Step 1: Gather Materials |
Balloons, string, stand, pump, and decorations. |
|
Step 2: Inflate Balloons |
Use a pump to inflate balloons with air. |
|
Step 3: Prepare the Base |
Set up a stand or use a fishing line for structure. |
|
Step 4: Attach Balloons |
Tie balloons to a string or insert them into a balloon strip. |
|
Step 5: Shape the Arch |
Arrange balloons evenly to form the desired shape. |
|
Step 6: Secure the Arch |
Tie ends to the stand or anchor points for stability. |
|
Step 7: Add Decorations |
Enhance with ribbons, greenery, or lights for flair. |
|
Step 8: Check Stability |
Ensure the arch is balanced and securely fastened. |
|
Step 9: Final Adjustments |
Fill gaps with smaller balloons or decorative elements. |
|
Step 10: Display the Arch |
Position the arch as a centerpiece or event backdrop. |
Preparing Your Balloons
The first step in creating a great balloon arch is to prepare the balloons. Different contours and sizes of balloons are needed according to the size and style of the arch. Typically, for a standard 6-8 foot arch, approximately 100-120 balloons would be required. You can opt for high-quality latex balloons, as they are durable and have a clean, professional appearance.
Step 1: Pick Out Your Colors and Sizes
Select the colors for the arch in accordance with the theme of your event. Apart from the color, you may use solid, metallic, or printed balloons, as adding different ambiance can help in creating an interesting effect on your arch. Balloon sizes commonly range from 5 to 36 inches. The smaller ones are suitable for filling in gaps and adding dimension; the larger ones will carry the bulk of the form.
Step 2: Inflate Your Balloons
A balloon pump—either manual or electric—helps inflate balloons. Overfilling balloons can cause them to pop during use. Being professional requires balloons to be of the same size, so having a balloon sizer can be a big help. It enables the viewer to keep the overall appearance of the arch consistent.
Step 3: Form Clusters With Balloons
Once they are clustered, they must be grouped in sets of 3 to 5, tying their necks with a string or balloon tape. These clusters will contribute to building height and volume, while also making it easier to lay the balloons on the arch frame later.
Step 4: Use a Balloon Sealing Tool
Try using a balloon clip/sealing tool; it will help speed up tying and prevent finger fatigue. It would help in creating large arches that consist of hundreds of balloons.
By now, all proper preparations for the elegant and strong balloon arch should have been made. Now that this is done, you will be ready to construct the frame of the arch and start attaching the balloons.
Assembling the Balloon Arch Frame
Step 1: Pick an Appropriate Frame Material
In creating the frame for the balloon arch, start by picking a sturdy material. Balloon arch frames, in general, are made from PVC pipe, metal rod, or flexible aluminum wire. PVC pipe is mainly favored for being lightweight and cheap; metal rods offer heavier-duty options for outdoor use. Flexible aluminum wire provides the advantage of ease of transport for portable parties, allowing it to be shaped into any required form. Ensure that your frame is suitable for the size and shape of your planned balloon arch.
Step 2: Establish the Base
A stable base for the structure is essential for counterbalancing the whole load. For this kind of frame arch setup using a PVC or metal frame, weighted base plates are best suited. Such weights can be heavy sandbags, water weights, or those constructed purposely for such use. Bigger arches may require 20-25 lbs per side to prevent accidental tipping. Weight bases or anchoring systems will likely need to be considered in cases of windy weather during outdoor installation.
Step 3: Assemble/Put Together and Adjust the Height of the Frame
Start joining the various parts of your frame according to the manufacturer’s instructions if you have a ready arch kit for installation. If you are fabricating your own, glue together the PVC pipes or metal pipes through their respective connectors; an almost perfect fit is required. Adjustable frames or telescopic poles may be good choices for you to consider when changing the height and width of the balloon frame to suit the available space. The typical heights for balloon arches range from 7 to 10 feet, while widths usually measure between 8 and 15 feet, creating an extensive and dramatic effect.
Step 4: Secure the Frame Using Tension or Ties
Check for any loose connections once the frame has been set up. For added security, you can use zip ties, duct tape, or metal clips to secure the joints or corners. With flexible wire frames, tension can be made by firmly anchoring or weighting down each side of the wire. Give the frame a gentle shake to check if it’s stable before proceeding to the balloon attachment.
Step 5: Get Set for Balloon Attaching
Consider covering the frame with thin fishing line, floral wire, or balloon tape to facilitate attaching the balloons. These materials give an extra level of support in keeping the balloons in position and can speed up the assembly of the design. Fix these supports onto the frame in stretchers, ensuring equal spacing for a balanced arch.
Following these detailed steps during assembly will ensure that your balloon arch is impressive and can withstand the event well. The well-prepared frame gives the base for a smooth and successful decoration application.
Attaching Balloons to the Frame
How are balloons ratified into this frame? Start by inflating your balloons to ensure they are all the same size. Using a balloon inflator would help maintain uniform sizes for creating a clean, professional-looking arch. Typically, balloon giant arches are constructed with a balloon that measures approximately 10 to 12 inches in diameter when inflated.
Then cluster them into threes or fours. You could tie them with fishing line, cable ties, or balloon clips. Event decorators say that grouping in odd numbers is more visually appealing. Once the handler clusters are attached, attach the clusters to the frame from one end to the other, winding tightly with the fishing line or balloon string to keep the clusters in place. Avoid creating significant gaps between clusters to achieve a neat and friendly look.
For greater resiliency, consider using weather-resistant balloons, especially for outdoor events. Latex or mylar would be the best choices. Research shows that balloon arches made of high-quality materials can last 8 to 12 hours outdoors and up to 24 hours indoors, depending on the heat value and humidity.
Another effective simulation would be layering balloons of different colors and sizes to enhance the three-dimensional effect. Some designers propose going wild with textures, perhaps using a metallic or matte finish, to make the arch that much deeper.
Creative Ideas for Decorating Your Balloon Arch
- Greenery: Add some fresh or faux greenery, such as ivy or eucalyptus, to lend a natural and sophisticated touch.
- String Lights: Twinkle fairy lights around the arch to create a lovely aglow for the occasion, especially when the event breaks into the night.
- Theme Decor: Embed props or small decorations that correspond with the event’s theme. For example, beaches would have little seashells, while a fall affair would feature mini pumpkins.
- Personalized Signs: Attach a custom banner or name sign to the arch that features a personal message about the event.
- Flowers and Florals: Add a stylish and colorful touch to the arch by incorporating pop silk or fresh flowers.
Incorporating Colors and Themes
Applying colors and themes should be able to bring décor appreciation tied to an event’s intent and nature. I select a color palette that complements the larger theme, blending bright tints for events that celebrate life, while leaning towards soft tones for those more time-honored moments. And the decorations themselves, be they fabrics, flowers, or props, should all reinforce and support the theme under consideration, thereby creating a fitting backdrop worthy of its human application.
Adding Accessories for Extra Flair
Accessories that beautify the entire event through careful thought create the perfect ambiance for life-long memories. Below are five chic accessories that put on an extra show for any setup:
- String Lights – Truly a classic beauty for indoor or outdoor events, string lights provide a warm glow and enhance the ambiance, especially at dusk. They can be draped over walls, crossed tables, or held overhead from the ceiling, granting that spark of magical beauty.
- Table Runners and Linens – The elegance of the table runner and luxurious linens adorn the dining area. Materials like satin or lace, chosen in colors that harmonize with the ink, tie the entire decor together.
- Candles and Lanterns – Candles in tall holders with a glowing ambience or grouped as centerpieces instill that romance and intimacy. Lanterns with an artistic look help light the pathway or act as accent features.
- Floers – Fresh blossoms in vases, garlands, or wreaths bring natural beauty into a space. Tie the color of flowers to the theme so that the decor stands out.
- Themed Stationery and Signage – Examples of custom signage include a welcome sign, a menu, and table numbers, all of which serve functional needs and enhance the theme. Adding calligraphy or fancy typography only amplifies their appeal!
Using Balloons Without Helium for Unique Designs
Balloons can add a charming touch to the décor if the helium isn’t used. They are versatile and allow for some creative freedom while designing something unique to charm any event. Below are some ideas to use balloons without helium:
- Balloon Garlands – Style charming garlands by tying balloons together onto a string or fishing line. These garlands can be hung along tables, walls, or archways for a festive look.
- Balloon Backdrops- Build eye-catching backdrops with balloons in combination with a wall or frame, which could be used for a photo booth or as centerpieces. Utilize a variety of colors and sizes to enhance the depth and texture.
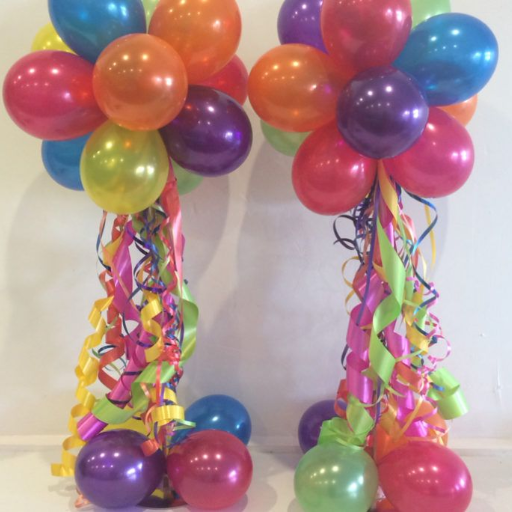
- Balloon Centerpieces – Attach balloons to sticks or rods and place them in a decorative container, such as a flowerpot or vase, to create centerpieces for tables that are much more creative and elevated.
- Floor Balloons – Scatter the balloons across the floors and designated areas of dance floors or play areas to give that fun and playful vibe.
- Balloon Sculptures – Construct fun shapes or figures with balloons and wireframes. This could range from simple columns to complex ones, like animals or letters, for themed occasions.
The above methods are very budget-friendly and simply require one’s creativity, offering an alternative option for event décor enhancement without helium.
Tips for a Successful Balloon Arch Installation
- Choose the Right Materials
Use durable, high-quality balloons to prevent popping while setting up or during the event. Some latex balloons are the popular choice and come in an assortment of sizes and colors. Be sure to have a balloon pump, fishing line, tape, and glue dots at hand so the setup can be done quickly and cleanly.
- Decide on Placement and Arch Size
Measure the area where the arch will be installed to determine the arch size and shape that best fit the design in the space and achieve the expected impact. For instance, an approximately 8-foot arch would require around 120 standard balloons, each measuring 11 inches in size.
- Create a Strong Framework
The balloon arch must be supported with a strong base and frame. PVC pipes and metal rods or a pre-made adjustable arch frame offer the kind of stiff structure that can withstand some amount of movement or airflow.
- Separate Balloons by Color and Size
Pre-sorting balloons by design is one way to ease the installation process. Cluster balloons together by color and inflate them to a consistent size using a balloon sizer, ensuring your design looks neat and professional.
- Secure, Ready ,and Testing
When the arch has been mounted, ensure that all balloons are tightly tied or glued in place, so they remain stable and do not shift. When held outdoors, weights should be attached to the bottom of the base and tested for stability before giving the frame a gentle shake to confirm it’s firmly built.
Securing Your Arch for Stability
As per experts and practical strategies, your balloon arch can be secured to remain stable throughout your event. When it is an outdoor event, wind can have a substantial effect in destabilizing the arch. Research suggests that using substantial weights on the base of the arch is recommended, such as sandbags or water weights. For example, a sandbag filled with 15-20 pounds per base is best as a holding mechanism for the structure. Also, consider using one of the durable materials for the frame from a weather resistance standpoint, such as PVC pipes or adjustable metal rods that can withstand external forces from winds or light rains. That’s for outdoor winds.
Note that even for indoor setups, stability testing should be a plus. With adhesive tape or glue dots and removable wall hooks, the same methods could be used to provide added security by reinforcing the base or attaching a few points to the walls. Manufacturers recommend using double-sided adhesive tapes or hook-and-loop fasteners that can hold between 10 and 20 pounds, depending on the adhesive properties.
Last but not least, in the presence of elements like strong winds or sudden weather changes, consider investing in balloon stabilization poles or mesh netting to prevent balloons from moving about. Online DIY trends suggest tying extra stabilizing strings or fishing lines to the arch for anchoring, ensuring it retains its shape and position while remaining visually appealing to guests.
Timing Your Installation for Events
Ideally, balloon decorations should be put up 6-8 hours before the event begins, allowing them to maintain their proper form and shape, according to the latest information and expert guidance.
Maintenance Tips for Long-Lasting Decorations
Here are a 5 styling maintenance tips from professional advice and user data to ensure your balloon decorations stay intact and vibrant through the entire event:
- Avoid Direct Sunlight: Balloons begin to degrade or explode when exposed to direct sunlight for an extended period. Always keep the legs of your decorations either in shade or indoors to save them from heat damage.
- Secure Temperature: Too much heat causes the balloon to expand and pop, while cold temperatures cause it to shrink and deflate. Maintain a moderate environment to ensure optimal balloon-working efficiency.
- Use Good-Quality Balloons: Using better-quality balloons will undoubtedly enhance their longevity. Companies that use thicker latex or Mylar materials rarely have their balloons pop. In other words, durable materials can prolong balloon displays by almost 50%, based on event experts.
- Use a Balloon Sealant: It will restore helium or air to balloons for longer than usual. Studies have shown that the sealant helps to increase the floating time of helium-filled balloons by 25%.”
- Keep an Eye on the Installation: Monitor your installation at intervals to make sure that none of the strings have come loose, and to promptly repair or replace any balloons that might start deflating or popping throughout the event.
References
-
“Accurate determination of the volume of an irregular helium balloon”
Published by the American Institute of Physics, this article discusses the physics and measurements related to balloons, providing insights into balloon properties and potential alternatives to helium.
Source -
“Scientific Ballooning”
Published on JSTOR, this article examines the application of balloons in scientific contexts, including alternatives to helium.
Source -
“Helium: the disappearing element”
A book discussing the scarcity of helium and its implications, which supports the argument for using air-filled balloons as a sustainable alternative.
Source
Frequently Asked Questions (FAQ)
How to Make a Balloon Arch Without Helium for Your Birthday?
Creating a balloon arch without helium is a fantastic way to decorate for a birthday party. Use latex balloons, which can be easily inflated with an air pump. Arrange the balloons on a balloon decorating strip or garland strip, tying them together securely. This method ensures your arch stays intact and is perfect for indoor celebrations.
What Are the Best Party Ideas for Making a Balloon Arch Without Using Helium?
For a stunning balloon arch without helium, consider using a mix of small and larger balloons in alternating colors. You can also incorporate foil balloons for added flair. Use a balloon pump to inflate the balloons and attach them to a sturdy arch stand. This setup will create a visually appealing backdrop for photos.
Can I Use a Balloon Pump to Inflate Balloons for My Balloon Decorations Without Helium?
Yes, using a balloon pump is an excellent way to inflate your balloons without helium. This method allows you to fully inflate each balloon, ensuring they last longer and maintain their shape. After inflating, you can tie the balloons together or use glue dots to attach them to a garland strip.
What Materials Do I Need for a DIY Balloon Arch Without Helium?
To create a DIY balloon arch without helium, you’ll need latex balloons, a balloon pump, a balloon decorating strip or garland, string or ribbon, and an arch stand. Optionally, you can use double-sided tape for extra stability and glue dots to secure the balloons together. These materials will help you craft a beautiful and reusable arch.
How Can I Create Balloon Arches for a Baby Shower Without Helium?
For a baby shower, you can create a charming balloon arch using soft pastel colors. Inflate the balloons with an air pump and use a balloon decorating strip to arrange them in a lovely arch pattern. Incorporate some organic balloon shapes to add a unique touch, ensuring the balloons are tied securely for a sturdy display.
What Is the Best Way to Tie the Balloons Together for a Balloon Arch Without Helium?
To tie the balloons together for your helium-free arch, simply knot the ends of each balloon tightly or use double-sided tape for added security. You can also use a balloon strip, which allows for easy attachment and adjustment of the balloons as you create your desired design. This ensures your arch holds its shape and looks great.
Are There Any Eco-Friendly Options for Making a Balloon Arch Without Helium?
Yes, you can opt for biodegradable latex balloons to create an environmentally friendly balloon arch. These balloons can be inflated with air and are perfect for outdoor events. Using a PVC pipe for your arch stand can also be a sustainable choice, allowing for reuse at future parties.
How Long Will a Balloon Arch Without Helium Last Indoors?
A balloon arch made with air-filled balloons can last a few days indoors, especially if the balloons are properly inflated and tied. To maximize longevity, keep the arch out of direct sunlight and away from heat sources. This way, you can enjoy your beautiful balloon decorations for an extended period during your celebration.