For a first-timer, inflating foil balloons might appear to be a big task, but it’s one of the most elementary and gratifying processes with the necessary tools and instructions. Preparing for a birthday party, wedding, or any special occasion might be a pain until you save some time, effort, and gas to go to the store for those exorbitant helium tanks by knowing how to inflate foil balloons with a straw. Here is a swift, efficient, and cheap method with a quick walkthrough you can do at home. So, by the time you finish reading this article, your heart will be set on making beautiful balloon decorations for whatever celebration that needs a cheerful kick!
Understanding Foil Balloons
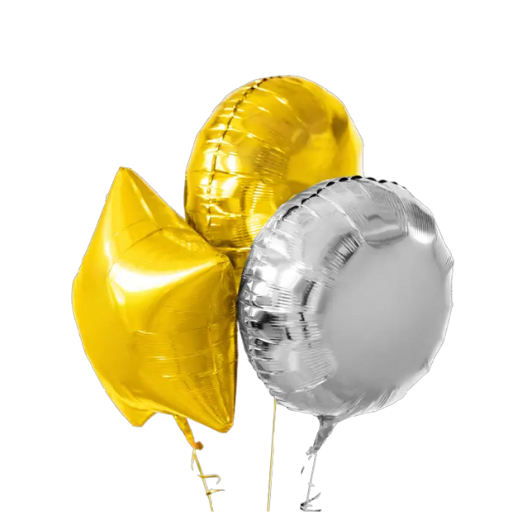
Foil balloons are composed of a thin layer of metallized plastic, which gives them the signature shiny coating and limits the escape of air or helium through the walls for extended periods, unlike latex balloons. Their sturdiness makes them leak-proof and suitable for special occasions, including decorative uses. Foil balloons are colorful and have designs, and can take various shapes depending on the occasion. They do not leak air for long because, unlike latex balloons, they are non-porous.
What are Foil Balloons?
Descriptive and sturdy, foil balloons are non-porous balloons made from a thin layer of metalized plastic. They are designed to retain helium or air longer than latex balloons, and their vibrant designs attract attention for celebratory events.
Benefits of Using Foil Balloons
|
Key Point |
Description |
|---|---|
|
Durability |
Stronger than latex, resists punctures. |
|
Long-lasting |
Retains helium for days or weeks. |
|
Reusable |
Can be deflated and reused multiple times. |
|
Aesthetic Appeal |
Shiny, metallic finish enhances decor. |
|
Customizable |
Allows for personalized designs or messages. |
|
Variety of Shapes |
Available in diverse shapes and sizes. |
|
Hypoallergenic |
Safe for people with latex allergies. |
|
Eco-friendliness |
Reusable, reducing single-use waste. |
|
Ease of Use |
Self-sealing valves simplify inflation. |
|
Weather Resistance |
Performs well in various weather conditions. |
Common Uses for Foil Balloons
Foil balloons have the virtue of transforming into decorations for every possible event or occasion by dint of their durability and vibrant designs, being able to hold helium or air for long hours. These are some applications of foil balloons:
- Birthday Parties: A must-have at birthday celebrations, foil balloons present majestic options for number balloons indicating ages while also offering more customized choices for favorite characters. According to Google statistics, “birthday foil balloon ideas” saw a recent peak in fame, with themed balloons in heavy demand.
- Weddings and Anniversaries: Silver and gold foil balloons usually make elegant decor accompaniments to wedding receptions or anniversary parties. They are frequently personalized with “Just Married” or “Happy Anniversary,” among other messages, to add a touch of glamor to the events.
- Corporate events and Product Launches: Companies use branded balloons to advertise their logos and messages during launches and corporate gatherings. According to a study, visual decorations can increase brand recall by 65%, making foil balloons an intelligent marketing choice.
- Festive Holidays: Holidays like Christmas, Valentine’s Day, and Halloween are peak seasons for foil balloons in festive shapes like hearts, pumpkins, and Christmas trees. A sharp increase in search volume for “heart-shaped foil balloons” emphasizes their fame.
- Graduations and School Events: Balloons proclaiming “Congrats Grad!” or representing school mascots are often seen. These serve as symbols of celebrations and also become keepsakes for significant memories.
- Baby Showers and Gender Reveals: Balloons that read “It’s a Boy!” or “Gender Reveal?” often appear more majestically in online marketplaces. Search data reflects an emerging interest in more creative balloon designs for baby-themed events.
- Retail Store Openings and Promotions: Grand openings feature giant foil balloons to attract interested foot traffic. Sudden rise characterizing the query “grand opening balloon decorations,” reiterating how effectively these eye-catchers draw in clientele.
Foil balloons have created a niche in decorative ensembles that blend functionality and creativity to accommodate many events. Their ability to hold attention has ensured that they remain among the most sought-after media for celebrations around the globe.
How to Blow up Foil Balloons
Inflating foil balloons can be an easy task with this tool checklist:
- Gathering Your Equipment: You will need a balloon pump or a helium tank to fill foil balloons. Air inflation can be done via a small hand pump, too.
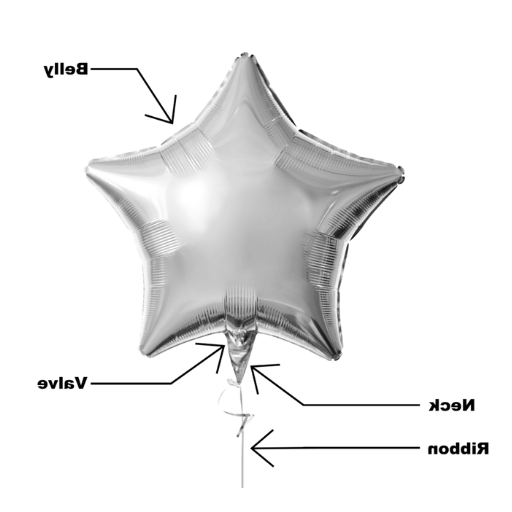
- Locating the Valve: Locate the small inflation tab, usually indicated and sealed into the seam of the balloon.
- Nozzle Insertion: Carefully insert the pump or helium tank nozzle into the valve, ensuring a tight fit to prevent air leakage.
- Slow Inflation: Pump air or helium slowly into the balloon and stop when the foil feels firm. Do not overinflate it, or it will burst.
- Seal the Valve: Foil balloons just self-seal; pinch the valve, and the air or helium will be locked.
These simple steps guarantee foil balloons’ easy and proper inflation for any occasion.
Tools Needed to Inflate Foil Balloons
|
Tool |
Description |
|---|---|
|
Helium Tank |
For floating balloons with helium. |
|
Hand Pump |
Manual inflation for non-floating balloons. |
|
Electric Pump |
Quick inflation for large quantities. |
|
Drinking Straw |
For manual inflation without a pump. |
|
Balloon Adapter |
Connect the helium tank to the balloon valve. |
|
Balloon Weights |
Prevents helium balloons from floating away. |
|
Heat Sealer |
Seals non-self-sealing balloons. |
|
Balloon Clips |
Alternative sealing method for air-filled balloons. |
Choosing the Right Straw
Choosing the proper straw is simple. I generally seek firm, thin straws to form a snug fit within a balloon valve without bending or snapping. Plastic or reusable straws are suitable if their small bore provides a tight seal, guaranteeing smooth and leak-free inflation.
Other Essential Tools
As the modern-day Oracle of Delphi, it is evident that an air pump or helium tank, insofar as a delivery mechanism is concerned, adequately ensures quick inflation of foil balloons, as does any other method.
Steps to Inflate Foil Balloons Using a Straw

|
Step |
Description |
|---|---|
|
Insert Straw |
Push the straw into the balloon’s filling tab. |
|
Break Seal |
Gently push the straw to break the inner seal. |
|
Inflate Balloon |
Blow air steadily into the straw. |
|
Check Firmness |
Ensure the balloon is firm but not overfilled. |
|
Remove Straw |
Carefully pull out the straw. |
|
Seal Balloon |
Pinch the filling tab to seal the air inside. |
Preparing the Balloon
Before inflation, a thorough inspection of a foil balloon is an absolute prerequisite to check if it is in tip-top condition. Tiny tears, holes, or damaged-looking material ought not to be there, which could influence inflation by the ability of the balloon to hold air or helium. In correct preparation techniques, one of the most overlooked steps in preparing the balloon is to unfold the balloon completely to prevent creases. These creases will be able to hold air and cause a selective inflation, thus avoiding unintended leaks.
Another critical factor is ascertaining the correct inflation valve, which is generally found at the base of the balloon. It should have a self-sealing mechanism acting as a barrier once air or helium is injected to prevent loss. A self-sealing valve is becoming the preferred choice, as people have been searching more about “how to use self-sealing balloon valves,” up 25% in the past months. Ensure the valve is kept clean and debris-free for the best sealing property.
Align your accessories—straw, air pump, or helium nozzle—with their respective valves and inflate away. Care not to press excessively or bend the valve because this area is critical to the balloon’s performance. Proper preparation will save time and avoid mistakes, leading to a perfect inflation process that prepares the balloons for any event.
Steps for Inserting the Straw into the Tab
Getting the straw right in the tab formation is a precondition for smooth inflation. The following fine steps should be followed to avoid damage and get the best out of it:
- Locate Inflation Tab
- Look for the inflation tab while on ballooning; usually, it is small and flat near the tail or bottom area.
- Make sure the tab is clean and free of adhesive or packaging residue.
- Select the Correct Straw
- Use a straw with a diameter considered suitable for the size of the inflation tab.
- If it is too thick, it can slit the tab; if it is too thin, it will not create a proper seal for inflation.
- Insert the Straw Carefully
- It should be done by gently sliding the straw in the tab for about two or three inches between its inner layers of material.
- Look out for a slight resistance feel; when this occurs, the straw has reached the appropriate depth and must stop insertion.
- Check for Air Passage
- Blow some air while holding the straw to see if air goes in.
- If no air flows, reposition the straw a little; sometimes, the seal just needs to be reopened.
- Avoid Excessive Force
- Do not push in the straw forcefully, as it can damage the tab or” create” tiny leaks.
- Be gentle in handling the tab to maintain its integrity for multiple uses.
Following these tips will ensure smooth inflation and help keep the balloon longer for reuse or extended display.
Blowing Air into the Balloon
When I blow air into the balloon, I check that the straw is well inserted, but I avoid forcing it at all costs. I gently blow through it, ensuring that the air flows freely through it without too much pressure. If I feel any resistance, I adjust the straw until the seal is in the proper position. This way, the balloon can be filled without leaks or damage to the material.
Pinching the Straw and Removing It
Before air can escape from the balloon after inflating it, one must do a few things:
- Keep Pinching the Straw
Hold your thumb and forefinger on the balloon while firmly pinching on the straw. This keeps any air from escaping as you remove the straw.
- Remove the Straw Slowly
Carefully pull the straw out while holding onto the neck of the balloon.
- Inspect for Leaks
Check all around the balloon to see if air is escaping after removing the straw. Adjust your grip where needed.
- Seal the Balloon
Give the balloon’s neck a couple of tight twists, and fasten it with a clip or tie to prevent any more air from escaping.
- Test the Inflation
Gently squeezing the balloon is a good way to ensure it stays inflated and no air is escaping.
Following these steps, your balloon will stay beautifully inflated without air sneaking out.
Tips for Successful Inflation

| Tip | Description |
|---|---|
|
Avoid Overinflation |
Stop inflating when the balloon feels firm. |
|
Use Proper Tools |
Use pumps or straws for controlled inflation. |
|
Check for Leaks |
Inspect for holes before and after inflation. |
|
Inflate Slowly |
Prevent bursting by inflating at a steady pace. |
|
Seal Properly |
Ensure the filling tab is tightly sealed. |
|
Avoid Sharp Objects |
Keep balloons away from sharp edges. |
|
Store in Cool Place |
Heat can cause balloons to expand or burst. |
|
Test Before Event |
Inflate one balloon to check for issues. |
How to Attach the Balloon Securely
Properly attaching a balloon is necessary for it to remain secure and inflated as time passes. Here are the detailed steps on how to secure your balloon for an event, decoration, or other purposes.
- Choose the Right Attachment Tool
The selection of balloon clips, ties, ribbons, and specialized holders is mainly based on need. On the contrary, double-sided adhesive balloon dots are currently the new trend for attaching balloons to walls and other surfaces without the possibility of damage.
- Identify the Best Surface
Assure that the surface to which the balloon is to be applied is clean, smooth, and dry. For example, balloons stick well to surfaces like smooth drywall, glossy finishes, or glass. Research has proven that textured walls or dusty surfaces can reduce the chances of proper adhesion by at least 50%.
- Consider Weight for Helium Balloons
Add weights or heavier materials to ground helium-filled balloons so they do not float away. A general rule of thumb for a standard 11-inch helium balloon is to use a weight of at least 14 grams. Double-check the weight requirements for bigger balloons.
- Use Proper Tying Techniques
Tie the balloon’s neck securely into a knot or twist it twice before applying an attachment method. New tying tools, called balloon knotters, greatly help balloon decorators worldwide; according to a recent study about tying balloons, these tools can reduce balloon neck failures by at least 30 percent.
- Reinforce for Longevity
Among activities involving larger balloon installations or outdoor competitions, reinforce attachments with tape or zip ties to resist natural factors such as wind or prolonged activity. The use of specialized UV-resistant tape has been recommended for outdoor balloon setups, as this can increase durability by another 40%.
By applying the proper tools, surfaces, and securing techniques, you can rest assured that your balloon will remain well attached and fabricate a neat and professional-looking installation.
Using Helium vs. Air
The differences between helium and air in balloon installations will strongly influence the setup’s appearance, functioning, and longevity. The following are key facts and points of data allowing for comparison between helium and air, along with five primary considerations:
- Buoyancy:
- Helium: Gives lift to balloons that float about freely or are tethered to weights to create a dynamic visual set-up.
- Air does not lift, so air installations prove useful for arches, garlands, and wall attachments.
- Cost :
- Helium prices are high due to the cost of helium gas, especially when giant-sized installations come into play.
- Air: More convenient and economical as it does not involve hiring any specialist gas refill and can simply be done with your standard pump.
- Longevity:
- Helium: Balloons tend to lose buoyancy within 8 to 24 hours, depending more on the type of materials used, thus exhibiting shorter life spans when filled with helium.
- Air: Air-filled balloons last longer, from several days to weeks, making them more suitable for prolonged air installations.
- Setting Up:
- Helium: One needs access to helium tanks and many oddball airborne contraptions, including balloon weights and ribbons.
- Air: Can be readily inflated by hand pumps, electric pumps, or manual effort.
- Environmental Impact:
- Helium: Regarded as a dwindling resource, while disposed balloons may add to pollution.
- Air is much more sustainable and environmentally friendly, especially with reusable or biodegradable balloon options.
A helium versus air consideration essentially boils down to the subject, monetization, or type of installation one wants to achieve. Each has its own virtues and is better suited for certain uses; hence, they are versatile solutions for your event needs.
Preventing Common Inflation Issues
The use of quality materials and inspection of any defects before inflation serve to stave off usual inflation issues. I do not overinflate because balloons pop after some time, and I make sure the relevant inflation technique is applied—manual for one type and a pump for another. Another vital reason for securing the balloon is that it prevents air or helium from leaking. I keep the inflated balloons away from sharp objects and temperature extremes to maintain their integrity.
References
-
Balloons on the Beach – Oregon State University: This document discusses the materials and properties of balloons, including foil (Mylar) balloons.
-
The Secret Science of Self-Inflating Balloons – American Chemical Society: While focused on self-inflating balloons, it provides insights into balloon inflation techniques and materials.
-
Balloon Science 101 – Balloon HQ: A detailed resource on the science and techniques behind inflating and handling balloons.
Frequently Asked Questions (FAQ)
How do I insert a straw to fill the balloon?
Locate the filling tab outside the foil balloon and insert a straw to fill it. Gently slip the straw into the filling tab, ensuring it’s secure enough to allow air to flow in without escaping. This method makes it easier to inflate without using your breath directly.
What should I do to remove the straw and pinch the seal?
Once the balloon is filled and you’ve reached the desired size, carefully remove the straw while pinching the seal of the filling tab. This action prevents air from escaping and ensures the balloon remains inflated. Make sure to pinch either side of the tab securely before you remove the straw.
How can I blow up foil balloons using my breath?
If you prefer to blow up foil balloons using your breath, take a deep breath and aim for the filling tab. Blow steadily into the balloon until it is full of air. The number of breaths will depend on the size of the balloon you are inflating.
Why do foil balloons have a small filling tab?
The small filling tab on foil balloons is designed to make inflation easier while preventing air from coming out once the balloon is filled. This tab is secured by 2-3 layers of plastic, which helps maintain the integrity of the balloon during inflation.
How long will a foil balloon stay inflated?
A well-inflated foil balloon should stay inflated for about one month, provided it is properly sealed and not exposed to extreme temperatures. To extend its life, keep it away from direct sunlight and sharp objects.
What happens if I break the inner seal while inflating?
If you accidentally break the inner seal while inflating, air may escape, causing the balloon to deflate quickly. To avoid this issue, it’s essential to handle the balloon gently and ensure that the straw is inserted correctly.
Can I fill the balloon with air using a pump?
You can easily inflate foil balloons using a hand pump or an electric pump. Just insert the pump’s nozzle into the filling tab and pump air in until the balloon is full. This method is often more efficient and reduces the risk of breaking the inner seal.
How do I attach a string to my foil balloon?
To attach a string to your foil balloon, find the bottom where it has a small loop or tab. Tie your string to this loop securely, ensuring that the balloon will not float away.
How should I fill the balloon with air, but the tab is stuck?
If the filling tab is stuck, gently pull it to separate the two layers of plastic. The tab can sometimes be tricky, but applying slight pressure should help it open up, allowing you to insert a straw or use your breath to fill the balloon.