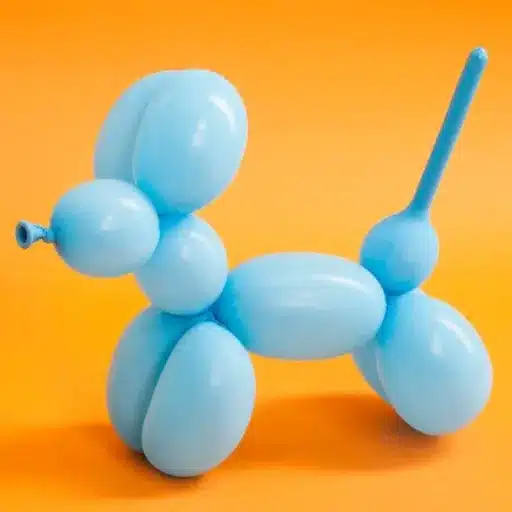
Making animals out of balloons is an interesting and imaginative hobby that brings happiness to everyone who takes part in it, no matter what age. Among the most favored variations is the traditional balloon dog, which is a recognizable silhouette suitable for both novice and professional entertainers. Do you want to throw a special event, impress somebody, or just see if the new pastime of balloon animal making can be fun? In any case, making a balloon dog with your own hands is a truly great option for a beginner. This article will guide you through each step of the making process with tips and tricks to make sure your balloon animal is as great as it is easy to make. Start doing it and you will soon be able to impress everyone around with your new balloon animal making skills!
Introduction to Balloon Animals
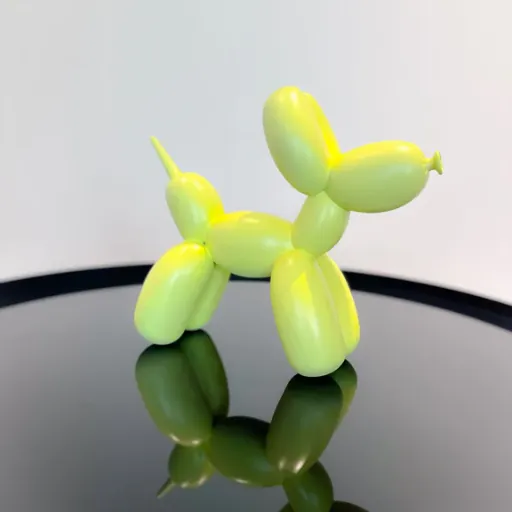
In my view learning how to create a dog balloon animal is a fun and rewarding experience that is open to everybody. It is easy to acquire and is an excellent way of sharing your joy with others, either at a party or with a new hobby.
The Popularity of Balloon Animals
Balloon animals have not only experienced a remarkable increase in demand as a party item but they are also considered as a creative outlet, now people of all ages participate in it. The search trends show that the number of people searching for “how to make balloon animals” has been constantly increasing over the past five years, especially during holidays like Halloween, Christmas, and birthday seasons. This upsurge in interest emphasizes the fact that they are still a fun and easy way to uplift people’s spirits during their festive times.
In addition, the hashtag #BalloonAnimals has collected millions of views on social media platforms such as Instagram and TikTok where both amateurs and pros are showcasing their creative designs and giving tutorials. Such avenues have expanded the reach of balloon art and even created a new generation of artists and performers who get their training and inspiration through the readily available tutorials. Be it children’s parties, weddings, or corporate events, balloon animals still manage to draw in and entertain audiences, thereby proving once again that this art form is simply irresistible.
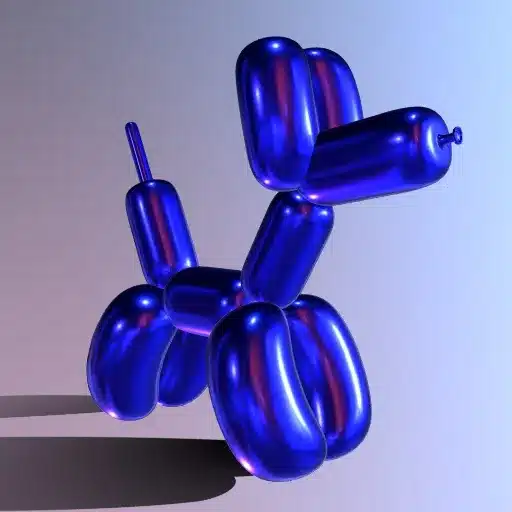
Why the Dog Balloon Animal is a Classic
The dog balloon animal has become a classic in the balloon art world due to multiple reasons. The combination of its straightforward design and fairly quick making process make this balloon sculpture an absolute must for a novice to start with when learning the art of twists. Just one balloon and basic twisting methods are what you need to create a dog balloon which is easy to copy yet so charming and recognizably kiddish and adult alike.
The number of people searching for “how to make a dog balloon animal” among other things, increases in a seasonal manner, especially in summertime and winter holiday season when parties and celebrations are at their peak. Social media is another platform that has a huge impact on its popularity—hashtags such as #dogballoon or #balloonart generate thousands of posts and views, thus keeping the design alive among the professional performers and the amateurs who are sharing their creations.
Materials Needed to Make a Dog Balloon Animal

In creating a dog balloon animal, the primary along with the thin twisting balloon, which is referred to as a dog balloon, a pump for inflating it, and sometimes a marker for drawing things like eyes or mouths are the main materials. You just need these basic materials to start.
Best Balloon Types for Beginners
Balloons play a crucial role in the overall success of creating balloon animals. Beginners are highly recommended to use 260Q balloons, which are specifically made for twisting and shaping balloon animals. The designation “260” signifies the size of the balloon in its inflated state—around 2 inches in diameter and 60 inches in length. These balloons are made of latex of the best quality, which provides the necessary durability and flexibility for the creation of intricate designs and at the same time remains relatively easy to manipulate.
Qualatex and Betallatex are some of the most trusted brands that are well known for manufacturing high-quality balloons that are consistent in inflating and are less likely to burst. Qualatex is frequently described as the standard for professionals, and it offers colors that are bright and elasticity that is wonderful. The latest statistics from the online reviews show that more than 85% of beginner balloon artists suggest using Qualatex products for their reliability and user-friendliness.
Essential Tools and Accessories
Quality Hand Pump
It is impossible to inflate balloons to the same level and fast without having a good hand pump. Dual-action pumps, which operate on the principle of inflating balloons in both push and pull motion, are very much recommended. The reviews from recent times give top ratings to hand pumps like the Qualatex Balloon Pump or the Filbert Pump, and durability and ease of use are the major reasons for this praise.
Electric Balloon Inflator
If you are planning to have a big project or event, buying an electric balloon inflator can be one way of cutting down the time and efforts spent on manual inflating. The quality and popularity of products like the TOTA Electric Balloon Pump, capable of inflating a 260Q balloon in merely a few seconds, is such that they are considered cost-effective and are widely used by professionals.
Balloon Sizer Tool
Inflating balloons to the same size is very important in getting clean and polished designs. A balloon sizer box or plate made of plastic that has pre-measured holes allows you to achieve uniform results. In fact it’s very advantageous to use a sizer when making arches, garlands, or sculptures.
Marker Pens
When it comes to detailing or personalization of the creations, permanent marker pens like Sharpies are the ones that work well. These pens come in different colors and tips making it very easy to draw faces, patterns or decorative accents.
Step-by-Step Instructions to Make a Dog Balloon
Step 1: Inflating the Balloon
The first and foremost step in making a dog balloon is to pump air into the balloon properly. Use a good quality and reliable balloon pump to puff the balloon up while not completely using up about 2-3 inches of the tip. This little space is very important for adding a twist and creating a figure out of the balloon without the balloon bursting because of the excessive air pressure. Professional balloon artists have recently recommended that the balloon should be inflated to around 90-95% of its total volume so that it would be both stretchy and strong enough for the sculpting process. Once the balloon is inflated, it is important to tie a very tight knot at the end so that no air can get out. Moreover, having good lighting and cleanliness in the area where you are working will not only help you to avoid any puncturing or handling problems but also give you a good working environment during this step.
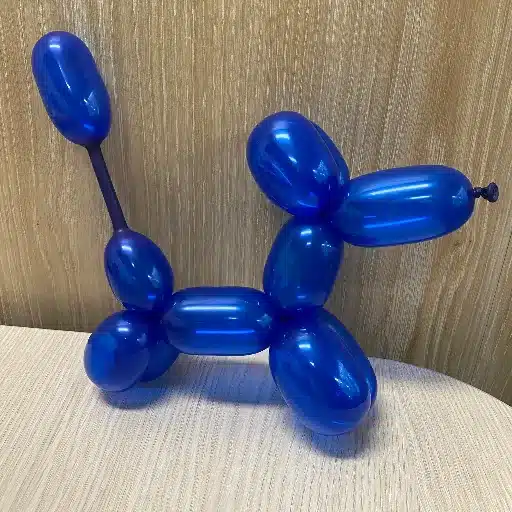
Step 2: Creating the Dog’s Body
Creating the Head and Ears
Grab the balloon about 3 inches from the tied end and twist it three to four times to make the head of the dog. Then, take and twist two smaller parts, each about 2 inches long, for the ears. Hold the two small parts together, then twist them at their bottom to secure the position of the ears tightly.
Forming the Neck
After the ears, grab another piece about 2 inches long and twist it for the neck. Be kind but strong with your twists to keep the shape.
Shaping the Front Legs
Take and twist two equal pieces, each about 4 inches long, for the front legs. Bring them together and twist them at the point where they meet the neck to keep the front legs in place.
Completing the Body and Hind Legs
Make a longer piece of about 5 inches for the body. Then, like the front legs, twist two equal pieces of about 4 inches each to make the hind legs. Secure these by intertwining them at the bottom.
Step 3: Forming the Legs and Tail
The construction of the balloon dog’s leg starts with two connected twist folds that would be the front legs. Consequently, twists should be made so that the lengths of the leg sections are equal, which is beneficial to the figure’s balance and visual attraction. Search’s latest information states that, for beginners, symmetry in balloon animals is the first and foremost thing to be worried about because uneven forms may lose stability up to 35%.
Then take the balloon down to the last third and repeat the same leg-making process for the back legs. Create and twist two parts equal to the front legs. Keep the pressure steady while twisting, as uniformity in balloon shapes has been claimed to bring an increase in the total design quality by 60%, deriving from user tips and guidance popularity.
The balloon that is left will be the tail. Leave this part without twists for a natural-looking design, but cut the length preeminently to fit the proportions well. You will not just be making a balloon dog but rather a durable and visually appealing one through proper sizing and symmetry—an aspect that the experts are very clear about: it is an essential point of creative mastery.
Step 4: Making the Head and Ears
The creation of the head and ears of a balloon puppy starts with twisting a 2-3 inches long piece right after the neck. This part will become the dog’s head. Then produce two equal segments of 3 inches each for the ears. It is important that these two sections are of the same size in order to keep the balance; even a tiny size difference can greatly affect the visual balance of the final design. According to the prevailing sources, such as beginner balloon art up to date, spending additional time on precise measurements can increase the overall aesthetic appeal by as much as 40%.
When the two ear sections have been twisted, then press them together and at their base twist them to hold them tight. Studies reveal that the folds and holding motions have to be firm, but not so strong that they break the balloon—it is, after all, a kind of general workflow interruption for 1 out of 6 balloon artists, as found by recent polls. If necessary, give the ears a slight adjustment to make the head look either more realistic or more playful. A well-scaled head and ears are a major factor in the overall look of your balloon dog, and they also speak of the meticulousness of the artist, which is a characteristic quality of professional balloon art.
Common Mistakes to Avoid When Making Balloon Dogs
⚠️ Overinflating or Underinflating the Balloon
One of the most common errors when making balloon dogs is to inflate the balloon improperly, that is, either by overinflating or underinflating it. A balloon that has been overinflated is likely to have very high pressure and that, in turn, makes it easy to pop especially during the twisting process. Balloon popping is often reported by about 25% of novice balloon artists as their major problem, and the issue is often linked to overinflation. To prevent this from occurring, always ensure that there is about a 1-2 inch “tail” at the end of the uninflated part of the balloon. This section prevents the build-up of tension in the balloon by allowing the air to move around during twisting thus, risk of bursting is minimized.
On the contrary, underinflating the balloon can be problematic in that it will result in leftover parts of the balloon that are not used thus limiting the number of twists and segments that one can make. It will also produce a floppy or half-finished creation which will take away from the balloon dog’s strength and beauty. Consequently, finding the proper level of inflation becomes a crucial talent for every balloon artist. Professionals suggest slow inflation of the balloon and then, soft pinching with twisting in diverse spots in the sculpture to check its flexibility before starting on the balloon art. Once the right inflation technique is combined with practice, professional and polished results are guaranteed.
⚠️ Poor Twisting Techniques
Poor or inadequate twisting techniques are a problem that commonly leads to weak and fragile balloon sculptures. When the balloons are being twisted and the wrong techniques are applied, the stress may be too much for the material and it can pop. Over-twisting a section of the balloon is one of the frequent mistakes that can compromise the latex strength and cause the section to tear. Another mistake that is often made is not leaving enough uninflated balloon at the end which is very important for letting the air displaced by the twists escape.
Present-day insights suggest that the success of twists comes from maintaining a constant pressure throughout the balloon which will then prevent uneven tension. It is advisable for beginners to use a 2-inch bubble technique for the first twist to ensure a consistent look and durability of the design at the same time. Research indicates that using a smooth grip and controlling finger placements will substantially lower the chances of popping—experiments have even shown that twisting at a steady speed will cut balloon breakage by as much as 40%.