The making of balloon animals is an impressive skill that connects innovation, agility, and just a bit of a playful element. One of the most recognized styles is the balloon dog which is always a big hit with kids, and it can also be used for parties, fairs, and as a gift that will definitely surprise the recipient. In this article, we will be providing technical and expert guidance to everyone whether they are novices in the art of balloon twisting or take it as their hobby making a dog out of straws. A parent may also find this activity a great means of bonding with kids while a performer might also find it a great way to add something new to his show. This article is going to walk you over the exciting process that you can start making now.
Introduction to Balloon Art
Balloon Twisting as a Colorful Art Practice
Balloon twisting is one of those art forms that craggedly combine creativity, dexterity, and engineering. Through the thoroughgoing knowledge of three fundamental factors – pressure, twist locks, and elasticity of the balloon – the artists are able to create both strong and visually appealing complex designs. Every twist, lock, and knot applied is functional and thus not only does it add to the visual appeal altogether but also guarantees the structure’s strength. The arrival of a new stage of the use of materials and technological gadgets like high-quality latex has made the art of balloon-making a great deal more standardized than ever before. The artists’ ability to control and manipulate the elastic and deflection of the balloon material is essential for the creation of the different models and, ultimately, for breath-taking effects in the showcase. Though it is not an easy profession to master, it offers the artist immense pleasure as well as the pleasure of indulging in the same vivid non-verbal and visual conversation with the spectators.
Should the first Balloon Animal be a Dog?
The very beginning of the art is usually marked with a balloon-made dog because of the simplicity of the procedure and the basic principles that can be seen in sculptures of a higher level. The first step is going through the basic twists like the ear, lock, and ear twists, which are the needed parts if somebody is going to make other complex shapes or figures. Making a balloon dog creates a connection between the artist and the material, as the learners not only discover the techniques for controlling the distribution of the air and the elasticity of latex prospectively but also the figure makes them feel being with the material. The balloon dog’s design has been a favorite with people and has become an exciting activity as it helps to unlock the good qualities in the artist and sharpen balloon art skills while proving to the artist that he can make what he does in the right way. The balloon dog is a practice through which beginners are being trained in the technical skill set which will be the bedrock for innovation and creativity in the changing art form of balloon art.
Overview of Balloon Dog Techniques
Making a balloon dog requires a few key methods there are exact and good knowledge of balloon handling dynamics needed. The first step is deciding on a good, stretchy balloon that will not break when being inflated and twisted and also by choosing the right size balloon you can make sure that your balloon dog is the perfect size. The blowing up of the balloon is the most important stage; a balloon with a one-inch space left at the end will enable the production of all the needed twists without the risk of bursting. The order in which the twists are made ~ beginning with the nostrils, then making the ears, creating the legs, and lastly the tail ~ the manual pressure applied must be the same for the whole thing, in this way the production of the animal will be smooth and you will establish the joints in the process.
The more skilled ideas concentrate on the development of symmetry and proportionality in style. It’s like that to carefully calculate the areas means to guarantee that of limbs or ears the length is the same. The balloons to be twisted and locked by using the pinch and lock trick has also to be a skill of the balloon artist so that no one else is needed for tying. The practice, however, of the novelties of balloon figures among the advancements is very likely going to bring the making of balloon dogs to the same level as that of the professionals and amateurs who have adopted the new technology. While still maintaining those structures that become basic, the step-by-step process of getting to the proficiency of the craft balloon dog was made possible.
Essential Materials for Making a Balloon Dog
Types of Balloons to Use
Latex balloons of high quality are the balloons of primary preference used in balloon modeling; they guarantee the best results. Among these, the 260 balloon is the standard choice. The 260 in the name refers to the dimensions of the inflated balloon when fully inflated—about 2 inches in diameter and 60 inches in length. These balloons are both flexible and durable, making it possible to create intricate shapes by twisting and folding without the added risk of bursting easily. The use of the 160 balloons (smaller in diameter, very close to the standard balloons) and 350 balloons (larger in diameter) also add structure and detail and sometimes they are employed for larger designs and greater detail. Apart from the artistic aspect, it is also necessary to use latex balloons for environmental reasons and thus choose balloons made from biodegradable latex.
Tools and Accessories Needed
A collection of specialized tools and accessories is needed to make intricate balloon art. Step one is to have a quality balloon pump, electrical or manual – it is essential for fast, precise balloon inflation without the risks of both over-inflation and physical fatigue. Balloon sizers are another basic hand tool, enabling the balloon to be standardized and even the most detail octave to consist of only the same sizes. When it comes to the most detailed sculpture, the best clips or scissors are the most required tools to make the cuts look very neat and the ribbon or string is mostly used for securing and decorative. Sticky dots and reusable balloon glue are the tools that are then used to attach the balloons tightly but without creating holes in the material. To sum up, the best thing to do to keep the balloons in the optimal conditions and prevent them from getting deformed or cracking due to different factors such as heat or moisture is to use storage bags or containers that are specifically meant for balloons.toBeInTheDocument
Purchasing Locations and Suppliers
If someone is interested in buying quality balloon supplies, there are quite a few reliable options to investigate. In such instances, the best places to visit are the stores that sell party supplies which are specialized. The reason for this is that most of the party supplies stores have everything starting from accessories up to tools that are for quality and professional use. At the same time, many craft stores provide consumers with a large array of goods in the form of ribbons, adhesives, and balloon inflators. Additionally, online stores are the best places to enjoy the comfort of doing one’s shopping from the comfort of the home. These dedicated sites contain different kinds of balloons with their specific attributes and detailed customer reviews, thus helping the buyer to make the most informed purchase. Manufacturers would be able to supply the required items in large quantities and the buyer could even purchase directly from them. On the other hand, the seller may not have the desired brand or might be out of stock and in such a case, the buyer could turn to the local distributors who are automatically capable of delivering faster and providing better customer service than the manufacturers. Thus, by such a dynamic purchase. The user can get the supplies required for the craft of the user.
Step-by-Step Guide to Making a Balloon Dog
Balloon and Grasp
First of all, buy a high-graded twisting balloon that is particularly meant for making balloons funny and cute. These kinds of balloons are normally created from hard-wearing rubber and thus are elastic and hardy enough to stand many twists without exploding. Before you blow up the balloon, pull it repeatedly in a gentle way towards both ends, in order to make it more flexible and less likely to tear during handling. After the process of stretching, inflate the balloon with a pump as it will provide consistent air pressure and reduce the possibility of getting hurt by manual blowing. Inflate the balloon, keeping an area of about 2-4 inches at the end, for the twists and knots. Tie the opening of the balloon with a firm knot to make sure the air is not leaking, and the balloon is now set for the shaping process.
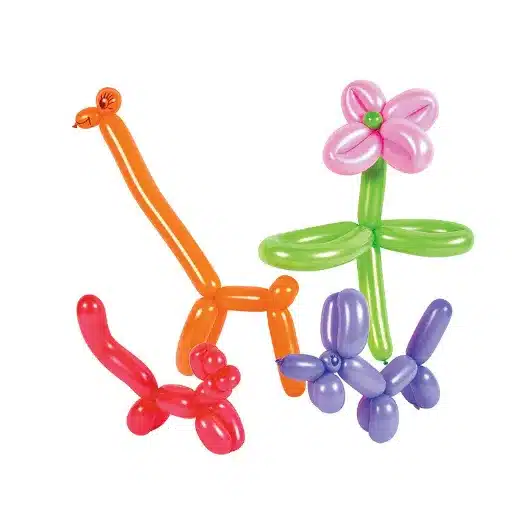
Simple Balloons and Designs Displayed
To become an expert in balloon twisting, one must first grasp the basic twists needed as a starting point for more complicated forms. The former is the most simple twist, and it is through combining two equal-length segments, bending them together, and twisting them that this can be done. This method is usually the one used to make balloon dogs or swords. With regard to the latter, however, the Pinch Twist is a very effective and common way to make parts of animals, such as ears or feet. Moreover, the Loop Twist, the technique where a bigger bubble is folded and twisted to create loops, can be used when making petals or the circular shape of flowers.
Achieving the precise air distribution within the balloon is a must to rely on those foundational techniques successfully. To guarantee the balloon’s stability and symmetry, the artist must have the same pressure all the time besides creating the figure with it. The latter could lead to bursting if the balloon becomes overinflated. The artists can create almost anything with their balloon and that can be from the simplest animal to the most complex one, by changing the techniques to the ways they need them.
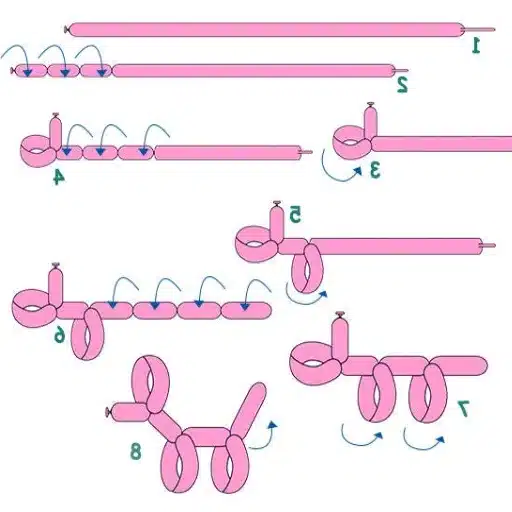
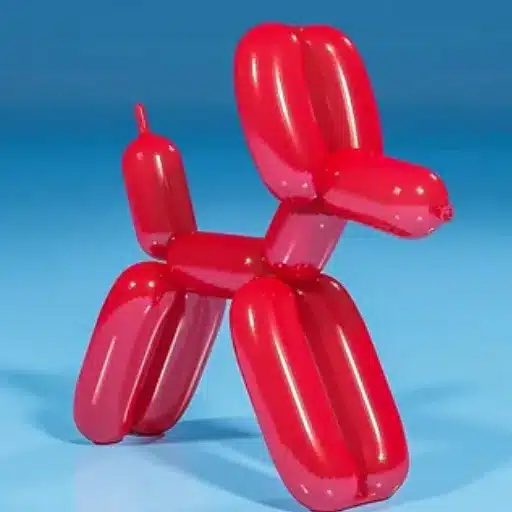
Balloon Dog: The Finishing Touches
Creating the balloon dog comes to its end when you put in the right shape and durability in each segment so that it has a neat look. Once you have put together the: head, ears, legs, body, and tail—these first steps one by one, then the next thing is to check each twist methodically to make see it is tight and equally distributed. Wherever there are any weak points, move and hold the segments again with extra care so that the tension spreads equally into the balloon and doesn’t break it.
When you get to the point, it is necessary to have the highest level of attention to detail. For example the adjustment of the length of the legs or tail to the sculpture’s overall weight and guarantee that it stands erect without falling. Moreover, excessive cautions on many sections may not be beneficial as they could weaken a very strong balloon. The last task is to check that no two views of the sculpture contradict its symmetry and the small errors are being corrected. By using passionate artistry and extreme care throughout the whole process, your final balloon dog will be both beautiful and sturdy.
Video Tutorials for Making Balloon Dogs
Recommended YouTube Channels
Balloon Animals Made Easy:This channel offers balloon animals the easy way. The tutorials are for beginners with very easy-to-follow instructions that cover the basics of balloon twisting. The videos are very good, the pace is perfect and there are also tips for troubleshooting common problems.
The Twister Sister:Her personality and creativity make The Twister Sister an artist with a difference. She offers a wide range of tutorials from beginners to those who are well-versed in the art of creating balloon sculptures. Yet because she is so experienced, she can build with her audience, making the process clear even to those who are new to the craft of balloon twisting.
Balloon Art Works:The channel has carved out a niche in balloon artistry for high-quality craft and striking designs. The range of the skills of the artists can be seen. Balloon twisting explanations and advanced techniques are closely related and the understanding of the whole process is then complete, although still under development.
Yonaimy Balloon Twisting: This channel offers brief but complete tutorials for a number of balloon sculptures. The instructions are given in the form of demonstrations, where one can start the crafting process either from a practical or an artistic perspective and thus are suitable for viewers with different skill levels.
Each one of those channels, in its own way, is a helpful resource for the improvement of your balloon-sculpting skill, no matter if you are in the first steps of your career or already a professional needing to widen the scope of your repertory.
Learning from other balloon artists
Collaboration with other balloon artists is not just about getting tips on the best techniques, learning about great designs, and seeing what the newest trends in creating with balloons are. Instead, it is about the artists watching to see what is different in working and so forth, which aids a lot in perfecting their own way of working and continuing to be creative. Furthermore, in the discussion, professionals reveal the specifics of sculpture, paint, and the “how to” of the stability of the designs. Apart from the learning process facilitated by the discussions, there is always the option to verify all findings and using the material. That is how they keep up and enhance their craft at the same time, the balloon artists through passing information, checking the situation, and learning from different problematic points to go through are getting better and better.
Tips and Tricks for Beginners
Avoiding Common Mistakes
In my opinion, one of the most common mistakes novices make in balloon decoration is the inadequate filling or excessive filling of the balloons. Adequate inflation is extremely important in the sense of getting the right shape of the balloon you have in mind and also as a factor of the following of your designs’ structural integrity. Overinflating can cause the rupture of the materials, while underinflating may result in the declined usefulness of twists and other methods. I strongly suggest employing a balloon pump that has a valve to regulate airflow in order to ensure that the inflation is consistent and precise. Get used to checking the amount of air needed by trying out various balloon sizes and types.
A very common error made is the hurry in the twisting process and no thought is given to the tensions and the alignment of the balloon. When the twists are made too tight or unevenly, the stresses that are produced are unreasonable for the material, so it becomes very possible that the balloon pops or takes a different shape. In my experience, the practice of working slowly and with a lot of control, particularly at the beginning, is one of the most successful methods for maintaining balloon shape. Besides, it would be great if you could manage to dampen your hands a bit in order to diminish the friction and to secure a firmer hold while handling the delicate twists.
Balloon artifacts are highly vulnerable to the outside world. The way of storing them can be a major factor in their state and functionality. This is because they tend to become brittle resulting in a much higher probability of them being popped when they are exposed to a lot of sunlight, heat, or humidity. I usually keep my balloons in a cool, dry environment, where they are not directly under the sun, and make sure that they are all put in air-proof containers so that their elasticity is maintained. With due attention to these factors and systematic participation, one is able to circumvent the common mistakes associated with practicing and giving a solid base to his/her balloon art skill.
Practicing Your Skills
I follow a step-by-step method using the essence of constant practice and reading as a tandem in order to build my proficiency in the art of making balloon figures. While having training, I am concentrated on the skill of blowing balloons to the right size, then tying them up and making some easy figures, and only then I am slowly moving to the more challenging layouts. Besides, I find it fruitful to have learning resources from places like YouTube tutorials, online courses, and forum discussions to keep myself in the loop of the new and popular techniques. Alongside the fundamentals study, which I carry out with perseverance, I reaffirm that my works are the best and undoubtedly professional by the time they are completed.
Setting specific objectives for each practice is one of the crucial elements of me getting better at what I do. To illustrate, I can work on the exactness of one kind of twist or work on the pace and the accuracy requisite for the putting together of difficult balloon shapes such as arches or custom figures. Further, I take inspiration from around the internet, learning to imitate popular designs, which is a great way for me to continue improving my method and maintaining client-pleasing proficiency. The most important thing when practicing is not just to have motion repetition but to really have progress that can be measured through your intents and actions.
Lastly, I believe that the feedback given to me has a crucial role in my skills developing. The truth is that It is only through constructive criticism from my colleagues, customers or people in online communities that I can see my weak points where I am supposed to work on. This feedback, apart from that I get from industry news and resources, is what I use to smooth my operation and offer the best. However, my balloon artistry can still progress if I constantly practice and study.
Ways to Get Creative and Experiment
When it comes to balloon artistry and exploring new concepts, I must say that by giving a try to or using different techniques like double-stuffing and 3D laying, the visual effects of your designs are going to be significantly improved. The concept of double-stuffing is actually using one balloon in the other for festive or every day events through creating a color mixture or maybe giving a plain design a little more depth. The help of such a technique with diverse colors assists me in making and subsequently presenting one of a kind and very refined and polished works in the realm of balloon art. On the other hand, the 3D layering, placing and by doing so creating a pattern of balloons that gives the main piece depth and texture, is the laborious and time-taking way to constructing intricate sculptures as well as the most dominating and attractive designs in the occasions and event areas.
Not only have I been honing my skills, but I have also been testing the waters by fusing new materials with my balloon art. One of the combinations would be balloons with LED lights that would allow me to produce glowing installations in which the presence of an idealistic spirit will be seen; in other words, perfect for night events. Equally, making use of paper or other lightweight fabrics for decorations can be a source of visual stimulation that one would not expect and lift the whole composition. These new approaches call for a lot of thought and consideration, but they make it possible for me to not only step out of the frames that traditional balloon artistry has set but also to create the kind of art that is both surprising and has a very modern, dynamic feel to it.
In the end, I catch up on what’s new in other design fields like flower arranging and event decoration to generate new balloon art ideas. Looking into geometric patterns, ombré color schemes, or even trending retro and minimalist styles not only helps me come up with the compositions that are most in vogue, but also the ones that are most fitting. The key to success in my work is the fusion of daring exploration and expertise, which leads my work to be able to fit, be up-to-date, and have the most impact.
Reference Sources
Balloon Twisting Basics – Southern Nazarene University – A guide on twisting techniques, including making a 3-twist dog.
Twisty Balloons – Southern Nazarene University – Detailed instructions on creating a basic balloon dog.
Class Information for Beginning Balloon Twisting – Highlands Recreation – Offers insights into learning balloon twisting, starting with simple designs like a dog.
Frequently Asked Questions (FAQs)
How can a child follow a step-by-step video to make a balloon-animal dog?
Watching a video tutorial on youtube can help a kid learn how to make a dog by seeing the twisting balloons and sequence of the first segment, second and third segments clearly. Many videos show the base and demonstrate the lock twist and how to form the neck and dog’s head so the proportions look right. A good tutorial will also cover the back legs and a tail and how to finish the sculpture so it stands up. Videos are free to access online and often include tips for using a hand pump to inflate to the right size. Following a step-by-step visual guide makes this easy to make even for a young learner.
What are the best step-by-step instructions for a child to make a basic dog balloon animal?
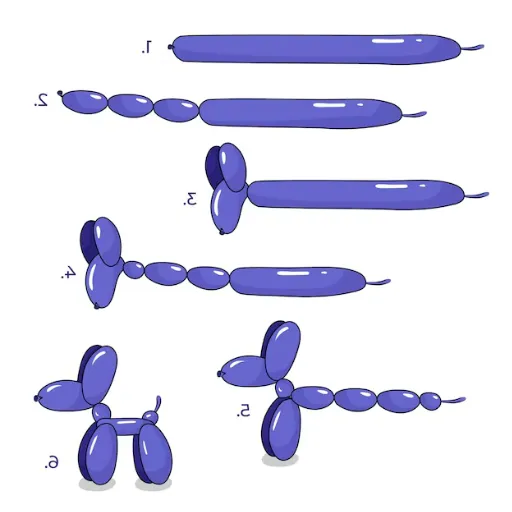
Tell me how a maker of six steps would be sufficient to craft a dog; the first step is the snout, and then the head and neck, then the front legs, then the body, then followed by a tail. An easy balloon and a hand pump will help to obtain uniform inch measurements and help avoid overinflation, which is prone to the balloon bursting. Then the lock twist and the balloon twisting magic make sure that the legs and the ears are nicely twisted and securely fixed so that they do not fall apart and we have a dog’s head with us. When the color is chosen, the ears or the snout color that is opposite can be used to give character at a party or event. These hints are for the kids to experience as well as for the adults who are picking up the art of balloon twisting sculpture-making by learning the basic steps.
Shall we check out if a child can manage to follow a YouTube video, a beginner’s step-by-step tutorial, ambitious in making a dog?
Yes, the very popular video platform youtube has many tutorials on how to do a dog from the very basics, with very easy models for kids and profoundly creative ones for the professional magician or party entertainer. Check out the videos which present the process very slowly, naming the bulge system and revealing it in the dog’s body and neck. The tutorials for newbies usually report on the balloon’s size and encourage the lock twist to be done over and over until you master it. Besides, many of the creators share the best ways to do the final touches such as ear shaping and snout tweaking so the sculpture looks much better. Through the help of repetition and advice, children can move on from a simple to a more complicated dog.
What is the first video step that a child can follow to acquire the art of balloon twisting for a dog?
Select a website that contains instructions on how to make a dog balloon in an adventure style: inflate to the right size, make the basic twists, shape the front legs, and then create the dog’s head and ears before finishing by working on the back legs and tail. The video must also provide the guidelines for taking the neck of dummy and point of the head while the other points of the rear limbs are together with one another. Films that have a description and slow motion are the most effective ways to grasp the tech of the secure lock twist and the creation of the dog’s head in such a way that it looks like a snout. Balloons are shown in using the twist plus to do the dogs the higher by repeating what they can do without the swallowing them cases first that is a video positive significance going around and good for all kids who can use this, and also the first parties for the key thing for the socializing side to have fun to be automatically the part of the school team-wise without even thinking about it.
What could the child learn from the tutorial that he or she could use to avoid the balloon dog being a pro at the first try?
A good balloon art tip is to leave a small part of the balloon not blown up at the end; that way you can have twisting space and the balloon will not pop, it is one of the basics that are imparted in nearly every first-timer’s class. One of the kids was really struggling but got there in the end. always making on the count of a hundred so that the dog’s forelegs may just be a tiny bit longer than the hind legs, and always twisting and locking is the secret to the durability of the sculpture. On the dog’s head, the parts seem loose, for example, the nose and the neck, so you should adjust them by taking an inch of the same segments that are the second and the third on either side of the head and neck respectively. The use of a pump to control the inflation process and then there will be no bursting out of the blue, which makes the students feel confident amidst learning. Devoting practice time for these little adjustments not only makes it easier for friends to learn but also gives one the ability to entertain at parties or simply just to enjoy sharing video clips on social media.
How can a kid move forward from making a very standard balloon dog sculpture and what different patterns might be used?
After the initial dog has been made, a child can try several other methods, like putting ears, fixing the color scheme, giving the face and neck more definition for a more realistic look that is great for social events or social videos. Following the programs of a professional magician or a balloon artist will present the being and the not less interesting small events that he/she may have attended. Consider the fun of the changing combinations of balloon sizes and the most dramatic effect of the various color combinations through the body area to form patterns or accents. To transform a basic skill into a mini event service or a photo challenge on Instagram, you just need to be interested in teaching others and in creating quick changes. Continued rehearsals with the methods for making the lock twist and for the art of handling balloons build guarantees and expertise.