Balloon twisting is a skilled art form that uses creativity, technique and a bit of fun to make fun shapes and whimsical designs. Whether you have the party, the unique hobby, or just the brightening of someone’s day in mind, getting hold of the basic of balloon twisting is an enthusiastic and also rewarding skill to acquire. Fully beginner targeted, this reference is taking the steps through the process in the simplest and most understandable way possible to give you the confidence to start creating balloon animals. We have the all covered right from the choice of the materials to the learning essential twists and techniques, and we will make sure you get all the knowledge to change the ordinary balloons into the extraordinary creations. So get ready to show off your inner artist and bring joy to the faces of your friends and family with your funky, personalized balloon animals!
Introduction to Balloon Twisting
What is Balloon Twisting?
Balloon twisting is the artful craft of molding and designing delicate balloons into artistic shapes that often look like animals, objects, or intricate patterns. This skill is done with the help of the use of very flexible latex balloons which are able to stretch and be twisted without the risk of popping. At the core of things in balloon twisting are proper handling such as basic twists, lock twists and pinch twists which provide a strong base for the more complex creations. Balloon twisting makes a large part of entertainment, event decoration, and is even a therapeutic method, so this craft is truly of many uses and cultural expressions. It is not only an amusing or funny thing you do at a children’s party but it is an art that needs one to be exact, creative, and the one should possess a fair knowledge of the material being worked on to make the art appealing and structurally sound as well.
Why It Is Important to Learn to Make Balloon Animals
Creating balloon animals is not just for fun and style; it brings along a totally different and exclusive set of skills that are a mix of technical and; human communication qualities. Latex physical properties comprehension is one of the most important things when it comes to mastering the art of balloon twisting. The technical knowledge has to be connected with being creative. It is thus the person who would be supplying the ideas, and the latex would be the instrument. The one who is very good must see and design the very minute of parts even while he is adapting to a particular situation decided by the viewer or the situation.
Not only does this craft pose an aesthetic value, but it is also a big booster for the hand dexterity and the eye-hand coordination of the person doing it by means of the very same performing of the precise twisting and manipulating of balloons into determined shapes moves. Further, the making of balloon animals in the street or in social gatherings enhances the communication skills of the person as the creator deals directly with the various audiences to comprehend the requests and establish a connection. Due to the reasons mentioned above, balloon twisting is also a method used in therapy, for example, in occupational therapy, in order to speed up and improve motor functions and social interactivity.
This competency, in the same way, yields professional benefits. The balloons markers and decorators frequently offer the balloon twisting services as an artful and thrilling aspect to the parties, business gatherings, and community events that are to the same extent immersive and interactive. The salesmen who go for the struggling business of art and design technologies might be by educating themselves in the balloon twisting art the same time driving for the creative entrepreneurship, and they will ultimately gain a skill set that will overcome the gap between the artist and the technician.
Overview of the Balloon Twisting Kit
The balloon twisting kit contains a vast array of tools that are essential in shaping large volumes of balloons into various figures and structures. Mainly, these tools are the high-quality, durable twisting balloons that stringent standards are met when they are produced from latex and which also exhibit characteristics of being flexible and not easily popped. Apart from that also a professional-grade hand pump or electric pump would be given most of the time for helping to pump the balloons up more quickly and also that would be a lot easier even in case the user is a complete beginner. Another feature that is common in these balloon twisting kits is that detailed step-by-step guides through instruction manuals or video tutorials for creating all varieties of designs, such as simple animals, rather complicated shapes, and everything in between that might be very interesting for kids parties. Some kits have things that are beyond the actual tools such as adhesive dots, pens for drawing, and special types of balloons, which definitely open doors of imagination and self-expression. A complete set for balloon twisting is not merely a teaching-aid device but a friend to the professional artists and amateurs likewise, looking for the best possible results in terms of beauty and size of their works.
Getting Started with Balloon Animals for Beginners
Essential Tools and Materials Required
Before you dive into balloon animals, you need to have a few key tools and the right materials that help you work easily and successfully. The very first thing that you need to have is good quality twisting balloons. These balloons are made in such a way that they are composed of very durable latex, which is resistant to breaking even after the twisting and manipulation-like activities are completed. They are available in a multitude of sizes and colors for the flexibility of different designs.
Required Materials:
- ✓
High-quality twisting balloons (durable latex) - ✓
Quality balloon pump (handheld or electric) - ✓
Black marker or non-toxic pen for decoration - ✓
Balloon clips (optional, for beginners) - ✓
Safety scissors for cutting tools
Also, a good-quality balloon pump that is effective is another thing that you must have. It is the means by which to inflate the balloons fast and in a consistent way that will not strain your muscle so much. A handheld pump is usually employed due to its portability while the electric one might fit more when you are working on a large project, requiring a lot of inflations. Not only do you need a pump but also a black marker or non-toxic pen to embellish the animals, giving eyes, noses, and other ornamental elements.
Beginners who want to achieve more accuracy and originality are also welcome to try some accessories such as balloon clips to keep the inflation process protected, and the cutting tools such as safety scissors. Using these necessary materials causes to ease up the process of creation to the first point of time and soon enough to all the varieties of techniques.
Simple Balloon Techniques for Beginners
Training on simple balloon techniques is required because it helps the beginners gain skill and confidence and develop a base. The most straightforward and simplest technique to start with is the basic twist where you take the balloon, pinch a segment and then twist one end to make part of the balloon separate from the rest. This is the most popular method for creating shapes such as a dog, sword, or flower. In addition to this, the lock twist is also a must-have skill for the newbie. It is nothing but the joining of two balloon segments by twisting and the twisting itself is what is used in the process where a person wants to stabilize a construction. Thus, this is a very useful skill for making loops or joining parts by using a different way of looping.
Understanding the art of proper balloon inflation is primordial for controlled manipulation. It is always suggested for the beginner’s to keep a small exposed tail at the end of a balloon by only partly inflating it to create a space for the air displaced during the twisting, which will ultimately prevent bursting as a result of the inflation due to the twisting. Furthermore, the correct hand positions during the manipulation also act as a buffer between the twists making their transition smoother. They also prevent material from becoming exhausted when high pressure is applied between twists. And, finally the basic techniques mentioned above give the beginners a structured way to progress with minimum if any dissatisfaction.
Balloon Animals Safety Tips
⚠️ Important Safety Guidelines
The use of safety measures is very important in creating balloon animals as through this both the creator and the viewers will have a smooth and safe experience. Hence, choose very good quality balloons that are not toxic and are mainly made for twisting and modeling, if you see that they are made of cheaper / inferior materials just don’t buy them because they will be a one big -popping and -harmful nightmare. Always keep your working area free of pointed objects that may damage the inflated balloons.
Ventilation is equally important even more so when inflating balloons by hand or by using a pump. The exposure of latex particles to the air may cause allergic reactions in some people. Care should be taken if very young children are around since they are at a high risk of choking on uninflated or burst balloon parts. It is best to inflate not more than required as over-inflated balloons burst more easily which may lead to panic or even harm to people in the vicinity. These are simple strategies which can effectively make the balloon animal-making process more secure and pleasurable.
Step-by-Step Guide to Making Popular Balloon Animals
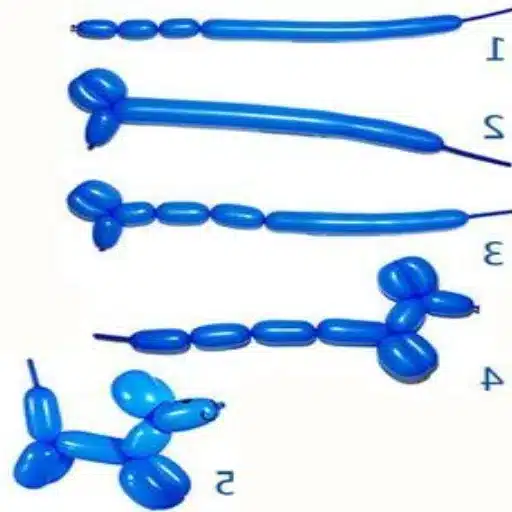
How to Make a Simple Dog Balloon Animal
An easily made dog-shaped balloon figure that can be made with utmost ease and in the process, you get in a grasp of the concept. The first thing you need is a standard 260 balloon that is very common for balloon twisting as its elongated shape and durability are of the highest quality. To that end, you should strictly adhere to the following steps:
- Inflate the Balloon:
Before that, inflate the balloon and leave about 3 inches without inflation at the tip of the tail. This non-inflated part is necessary to accommodate the air displacement that occurs during twisting and to save the balloon from getting over-inflated and eventually popping up. Tie the balloon securely.
- Twist the Head and Ears:
Begin at the knot end of the balloon. Twist a small 3-inch-long piece right away to make the nose. Position the twist so it won’t come undone then twist two more sections, each about 2 inches long, to produce the ears. Wrap up by folding the balloon and tying the ears’ base alongside the nose so as to lock them securely in place.
- Make the Neck and Front Legs:
Wrap some extra balloon under the head, approximately 2.5 to 3 inches, to fold into the neck. Immediately below the neck twist, shape the front legs with two equal length segments, about 3 inches each. Fold the balloon at the junction of the legs, and make a tight twist to define the front legs’ assembly clearly.
- Shape the Body and Hind Legs:
Now after making the neck and front legs, go for a 4-inch long segment to fold the balloon into the body. Later, create 3-inch equal segments following it for the hind legs in the same way. To comply with the front leg procedure, fold the hind legs and twist securely.
- Final Touches:
The last unswelled part of the balloon will become the tail. If required, re-size the sections to get the desired look of the whole figure. Remember to give a proper check on twists for their security; also press lightly to shape without popping the balloon.
Through sticking to this well-organized method, you can always make a well-shaped dog balloon animal. Rehearsal will also make you more accurate and quicker, which in turn gives space to create more intricate designs as your skills evolve.
Creating a Cool Balloon Cat
At the very start of making a balloon cat, inflate the balloon, keeping on it a 4-inch long tail to make sure there is enough space for twisting. Make three small, equal-sized bubbles to begin the head. Then twist the first two bubbles together, making the cat’s ears, and the third one will form the head. Be sure to twist with the correct tightness to keep the structure together.
For the body, twist a larger part of the balloon beneath the head to make the neck of the cat. Then after that, twist two longer parts of the same length to make up the front legs. Make sure to make the two front legs touch each other at their bottoms to make the cat stand properly. After this, twist a somewhat larger part of the balloon into the torso part, then follow with two equal parts for the back legs, like the fronts. Such a lock twist will join all these parts firmly.
In the very end, do not let the uninflated part of the balloon be left out; rather make use of it by making the cat’s tail. Most of the time it is common to straighten or curl up the tip of the tail to contribute some character to the design. Post-creation check-up is essential especially for all twists and joins to ensure they are firm and reliable. The result will be a visually delightful balloon cat with a harmonious design.
Balloon Flower Twisting as a Funny Activity
Creating a balloon flower is an exciting and rewarding activity that needs one to be very careful and to follow a logical path to get a loud and a more symmetrically designed flower. Start with a balloon that is fully inflated while squeezing it gently in the middle to allow for the flexible movement of the air inside. (Overall, do not inflate the balloon’s end with a one inch gap.) One will start with making the center of the flower by twisting a little loop (usually around two to one inches log) which will be the main attention point.
After the flower’s center is in place, structure its petals. The rest of the balloon should be apportioned into equal segments, typically five to six sections based on the number of petals to be accomplished. Each section is then tied and twisted at the bottom of the central loop to create gorgeous, equally spaced petals. A big chunk of aesthetic symmetry is having every petal the same size which therefore is very important for the overall balance of the flower.
Use a distinct balloon that is fully inflated in green for the stem and give a similar uninflated part for flexibility. Drape the petals of the flower around the top of the stem and tie the flower securely, so that you have a strong connection meanwhile. In the end, articulate the last part of the green balloon into leaves by making two little loops near the flower base. Don’t forget to check all joints and changes for their alignment and resistance. The end product will be a balloon flower that has vivid, clear lines and that is professionally crafted at the same time which will make it an eye-catching thing.
Advanced Balloon Twisting Techniques
Making a Balloon Hat for Special Occasions
Creating a balloon hat requires precision as well as careful planning to make sure it is not only visually appealing but also structurally sound. To commence, you need a long twisting balloon (usually around 260Q) of the appropriate color according to the theme of the event. Blow the balloon up while still keeping about a one-inch tail to make sure the shaping could be easily done. The head of the person wearing it should be measured with the balloon that is blown up but not too tight fitting, take the closure of the loop securely and go on twisting. This actually makes the hat’s first part.
Then, get more balloons and create some of the following things: spirals, loopes or elements of some certain theme. Blow each balloon and leave a certain amount of it uninflated to be able to work with and then twist it onto the base loop. When it comes to complex designs, like crowns or festival patterns, some more small balloons can be introduced in order to give a more intricate detailing. The thing that needs to be kept in mind is to twist the whole sculpture tightly and to make sure that all the loops are self-reinforced to secure the shape of the hat and also make it durable for the future.
At the end, the maker of the balloon hat should look at the whole piece and inspect if all the qualities of symmetry, convenience, and lightness are qualified. Every part should be corrected and any part that does not fit into the phsycal conversation of the piece should be removed. Owning to the fact that this interactive experience of putting on balloon hats is becoming a craze for such occasions as birthday parties, fetes, and themed festivals. It gives a personal touch to the event and at the same time adds a uniqueness to the whole scenario.
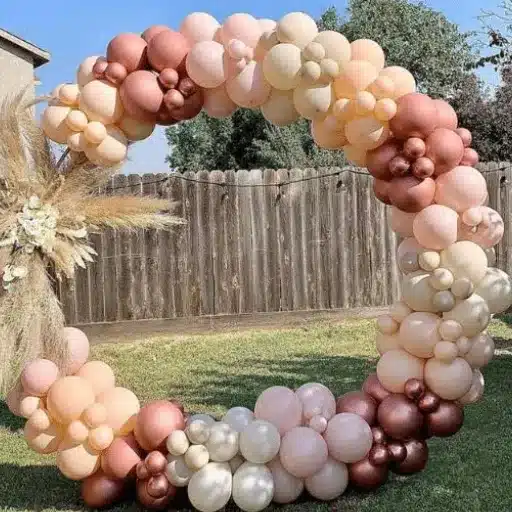
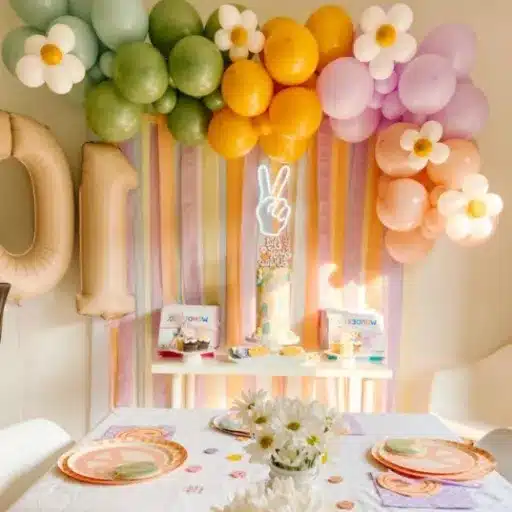
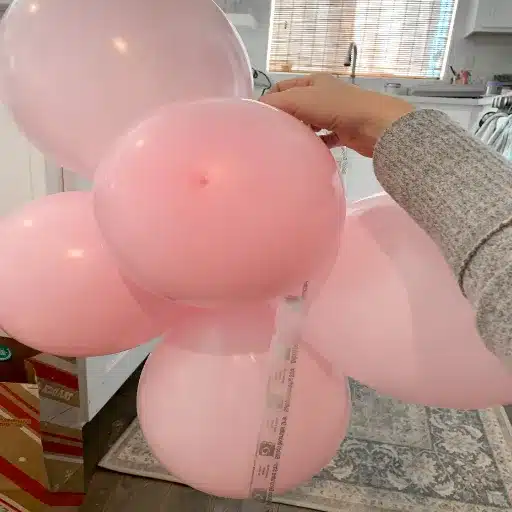
Decorative Arrangement of Balloons
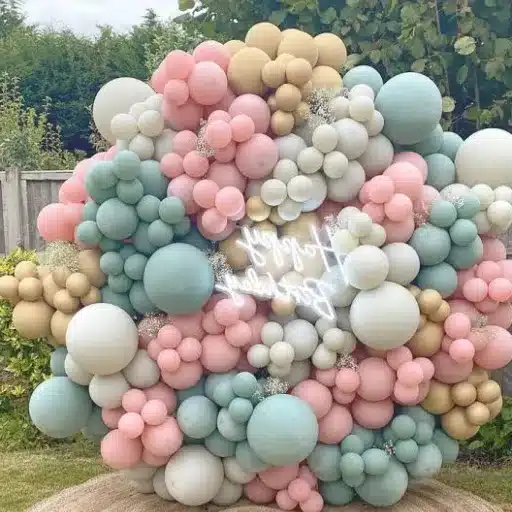
For the perfect and ideal balloon arrangements, one must factor in the importance of design aesthetics, stability, and material quality. To arrive at something eye-catching and long-lasting, you must begin by picking out very good balloons that cannot easily burst while at the same time they are able to maintain their original shape for a long time. Choose the balloons’ sizes and colors in such a way that they harmoniously blend at the theme or event with a proper balance among the primary and accent colors so as to be constructing depth and contrast.
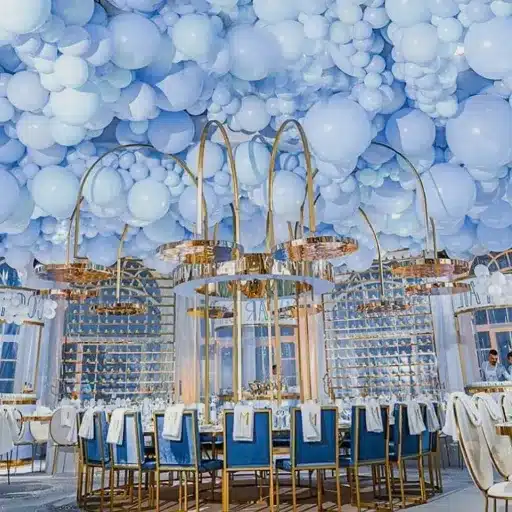
A crucial part of the arrangement is the structure, as it provides stability and support for the designs. Different bases like balloons or frames made of materials such as pipes or heavy stands make the structure strong in all weather conditions. Technique of layering such as spiral article and bunching can give the final piece a touch of reality and height. One thing that every balloon must do is to inflate correctly as the inconsistency in inflation can be the cause of the arrangement losing its balance and cohesive look.
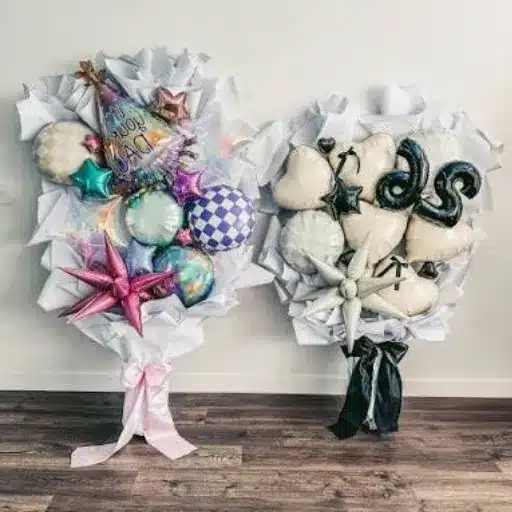
Incorporating specialized elements such as foil balloons, LED lights, or decorative ribbons can add a touch of sophistication to the design of more intricate balloon arrangements. These elements should be well incorporated. Otherwise, they can overpower the design, and in turn, lead to less stable results. To eliminate this problem, the created structural integrity of the things should be regularly checked to prevent deflation or displacement during the event. By sing the detailed principles, one can be sure to make professional, fascinating balloon arrangements for all events.
Using Multiple Colors on Your Balloon Animals
One of the factors that make balloon animals more attractive is their use of multiple colors. The involvement of colors brings out not only visual beauty but also a dynamic and very appealing aesthetic that grabs attention. To incorporate this method successfully, one has to know the color theory and the rules of the harmonious combinations. For example, complementary colors – blue and orange – make a strong contrast, while analogous colors – blue and green – give a more equilibrated and whole appearance. To create the further illusion of depth and complexity, gradients and patterns can also be brought into play. Moreover, the position of colors plays an important role- placing the bright accents in the areas of the design that are the most significant, to bring the viewer’s eye there.
Quality and type of balloons are among the significant factors taken into account when a variety of colors are being used. Be it the ebonite balloons having the excellent elasticity and saturation of color; they all lead to a perfect end product that is identical in all perspectives. Moreover, the air going into the balloons is not blowing bubbles at a kid’s birthday party that can ruin everything. Instead, it is meticulously spread out to the hard-to-reach corners of the piece which can even take the form of distortion and irregularity in the shapes and shades where they are least expected.
Taking the two-colored balloons as an example, we can consider that the balloon with a, let’s say, pale aqua color, has also a transparent one as its top layer. We can further play around with the size of the balloons, e.g., the balloon with a watermelon color could be bigger than the other one, as well as with the colors, making sure to have the beige balloon as the third one in size. At this point, we may use the airbrush to make tiny marks. One might think that it may be of no use, but time tells us that all these little things contribute a lot and greatly. Continuing the process with the struggle to come up with something new, you may get to the brightest thing ever and most fun as well. Nonetheless, one always should remember that the saying “no pain, no gain” does apply here.
Conclusion and Next Steps in Balloon Twisting
Practicing One’s Balloon Animal Skills
To improve my balloon animal skills, the first thing I do is to master the fundamental principles and then move on to more complex designs. I make use of good-quality balloons and a trustworthy balloon pump to work effectively and avoid any unnecessary breaking. Right at the start, I practice basic twists—the loop twist, lock twist, and pinch twist—which are very important techniques and also serve as the base of many advanced creations. Doing the same thing over and over again is essential; therefore, I give myself time to work on the creation of simple balloon animals like a plain dog or sword from latex balloons so that I can later create more complex ones easily.
Every detail of the design creates an image of special learning, both in tutorials and by looking at expert balloon art creators on video and step by step instruction websites. I always used to see the majority of these resources in order to have the best designs and to get the power to create. For the reason of speed and accuracy, I cut the whole thing up into workable sections and did one at a time. Also, I give myself the gift of working up through different difficulties like, for example, and stretching and pointing to the best Figure made up of inflatables and such that it is the furthest the animal can produce or the sculpture or a bunch with mondrianism.
Besides, the video-making is part of my practice too, and after the work is finished, I am looking for correctness, symmetry, and proportions. Taking part in forums on the internet or–in primary schools, college or in the workplace is a stepping stone to me showing the world what I have done and helping me grow to better levels by responding to some criticisms and watching methods used by masters or grandmasters in person. The practice that is on-going alongside the never-ending learning and refining is the method I use to move forward in balloon twisting and to reach high-level professionalism in terms of results.
Joining Balloon Twisting Communities and Forums
Taking part in certain groups and platforms connected with balloon twisting has always been an important part of my artistic growth. I am allowed to learn from other artists i.e. novices and the more experienced ones, by the way, the spaces are organized and managed. Especially with reference to Balloon Animals Blog, The Balloon Twister Forum, and groups on various social media platforms like Facebook, I get the chance to access up-to-date information, the latest trends in design and lots of tips and tricks specific to the artistry of making balloon animals. Of all the benefits one of the richest is getting updated with the latest industry information, new techniques as well as innovative products, thus helping me to advance more quickly as an artist.
A significant advantage of being a part of these forums is that design feedback can be asked and given. The members are usually quite open and enjoy showing off what they have made through photos and the like, even tutorials. This content can be very helpful for me to learn and apply it to my projects. Furthermore, the contests held in some forums or they may mark out up with adventures that go away from the beaten track push me to the most exciting. The constraints in a way that these base constraints are creative. My taking part in these activities allows me to do two things in the company of my peers: measuring my development on the one hand and acquiring a very different perspective on the other hand which makes me a balloon twister artist just like that.
Such communities also make an avenue for networking, which is essentially necessary for establishing a professional reputation. Through the communication and interaction with other artists, event organizers, and even suppliers, I have a chance to get to know the connections in the industry which, in turn, can bring about the possibility of collaborations or job opportunities. Moreover, attending live virtual workshops and participating in discussion threads have always been such empowering tools, so one will never only have the technical know-how when being part of this or that balloon twisting forum but also the self-assurance to take the career of the artist to the next level in this niche.
Expanding Your Balloon Twisting Creativity
Expanding my creativity in balloon twisting is a continuous process for me. To sustain this, I am constantly exploring new techniques and artistic trends that are my source of inspiration. One of the best ways, in my opinion, is to play with advanced twisting methods like weaves, braids, and multi-balloon sculptures because they can help me make more complicated and yet more beautiful designs. What is more, it is a process of not only testing but also of creating stand-out items. Apart from that, I also have a regular look at some video tutorials and online classes that are run by professional balloon artists who usually give away secrets in the form of tips, shortcuts, and even design. And, also, following the latest news and industry developments showing, for example, the rise of themed balloon installations for events, makes me the more willing to keep up to date with current customer preferences.
Digital resources and social media platforms are another great source of inspiration for me; and I take great value in them. Websites like Instagram and Pinterest play a great role as they are full of visual ideas and they help me access the work of the best balloon artists from all over. The advantage of this is that I can compare and contrast different stylistic elements and use the ones that look good to me as well as add my uniqueness to the projects. Meeting other balloon artists through the web and sharing their work with the world by participating in design competitions is a way to challenge ourselves to move farthest from where we normally operate and develop the thinking capacity. Thus, I always think out loud that creativity is collaborative and do acknowledge joining creative societies or simply working with peers which turned out to be worth my effort in advancing my skills to the next level.
Reference Sources
-
Balloon Animals Guide – A detailed guide on making various balloon animals, including step-by-step instructions.
-
Twisty Balloons – Instructions for creating basic balloon animals like a dog, with easy-to-follow steps.
-
Gallery – Texas A&M Physics Show – Features balloon animals as part of educational and interactive physics demonstrations.
Frequently Asked Questions (FAQs)
❓ What tools are necessary for a child to learn how to make a balloon animal at home?
One of the easiest ways to learn how to make a balloon animal, especially for beginners and children, is by watching a video tutorial. There are already many youtube tutorials to choose from that show twisting step by step and explain the most common tricks like locking and folding. Using a pump and making a dog or sword are the first things you will learn and these are almost like magic. A good tutorial will also teach to avoid pops and work with different Qualatex sets. Try not to move on to complex designs before completing a simpler project and getting more confidence out of it.
❓ What basic balloon tools should a child have to start making balloon animals at home?
For a beginner child, you will need a small balloon pump, a set of quality balloons like Qualatex, and a few basic inflatables, e.g., 260 modelling balloons which can be used for practice if the child wants to start with models that are easy to make. To avoid unwanted balloon pops, the child should be taught by an adult and to help with the most difficult twists. One amazing way to start is teaching how to make a flower or a nice hat, which is fun for both sides. A wide variety of beginner kits are available on amazon, which not only come with printed instructions and a few tricks but also some kits provide a basic tutorial or a video link. Also, with the choice of the sequence of practice, it is easier for children to follow and the YouTube cute designs would be a hit among kids. Of course, regular practice is the key to learning to avoid mistakes and later on getting involved in more complicated decorative techniques.
❓ How should I do a simple balloon flower for kid parties or decor?
Constructing a simple balloon flower is an amazing project for beginners and you get a party decor or to entertain kids in a very cute way. To get started, create the central bubble and the four petals that are always the same size, twisted from just one balloon; afterwards, connect a short stem from a green balloon; also, a lot of tutorials use a very simple method that is perfect for beginners. For your two main helpers – visual references and a pump – you can use youtube videos and keep inflating the balloon to a consistent size without the risk of a pop. Flowers are a very quick and fun project for learning locking twists as they are a good option for table decor and also hat embellishments. Besides, if you spend time practicing the flower, you will get to both make more complex designs and use a balloon kit with more efficiency.
❓ Even if there are no great and simple balloon animal tricks, can you still provide us with some tips to avoid balloons pop at a child’s party?
Yes, there are a few simple ways to reduce impromptu bursting at a kids’ party: have a pump, don’t overblow, and keep sharp objects and rough surfaces out of the balloons’ way. Besides that, the inflation process might take longer if you use high-quality balloons from Qualatex or an amazon set that has good reviews; however, it will be well worth it! Simplify the process for the kids and handling things it in small time frames so that the balloons do not get too stretched. The simple act of pre-making some items like hats or décor can reduce the party’s time spent on fragile builds. Watching a quick video or tutorial beforehand will help you to learn the art of twisting along with how the balloons hold the shape through the extra burst of air and the proper tying, etc.
❓ How can I shift from producing simple balloon animals to more complex decorations and stunts for events?
Transferring from the formation of simple balloon animals to the making of complex decor requires the exercise of basic twists, the assurance of new folding, and the steps in querifying from advance tutorials. The way to go is first walk dogs, make flowers, and craft swords through twisting, then bring them balloons for clusters and arches for the decoration of the event. To make the work smooth and reduce balloon bursts, while making complicated designs use a good pump and select balloons by higher quality brands like Qualatex. To learn the old school way, through youtube, and the modern way, attending workshops or using step-by-step tutorials, would both help in the learning of the tricks apart from the sequences. Little by little, become a member of sets and tools can get from Amazon, for instance, expand your capability while at the same time creating eye-popping party magic.