Dress up your party with some colorful balloons, and you will instantly see the mood getting jolly. Balloon animals can have such a wonderful power of spreading fun and excitement over any occasion. And it’s not just alike to birthday parties for kids; taking the role of the entertainer at a family event, or just surprising your friends with this new skill, the process to learn crafting simple balloon animals is an amusing and surprisingly easy one. In this guide, we have taken beginners as our priority and have made the process really simple that in no time you will master the basics. After going through this article, you will be able to make the next air-filled animals that will make everyone’s day brighter. Do not hesitate; it is a fun and rewarding hobby waiting for you to discover!
Introduction to Balloon Twisting
Art of Making Balloons
Balloon twisting, commonly known as balloon modeling, involves a combination of creativity, a good sense of material quality, and the right tools at skilled hands. The technique at its very heart is based on inflating balloons that are especially designed, which are mostly made out of latex, and then molding them into different shapes by twisting and interlocking. The main advantage of these balloons is their strength and flexibility which allow just about any design- from simple shapes to complex sculptures like flowers or medical-grade balloon characters, to be made.
Material and method improvements have raised balloon sculpting from merely an amusing pastime to a high art, reputed for its in-depth uniqueness and the professionals who exploit their skills at events and performances. Balloon twisting is not only an activity performed for entertainment, but it’s also applied in the educational field as a method for teaching problem-solving and motor skills development. Good understanding of balloon tension physics and of a systematic design plan is necessary for the making of durable and good looking creations. This manual will be your cornerstone, guiding you through the acquisition of all the necessary tools, techniques, and theory for becoming proficient in this exciting art.
Why Start Balloon Twisting?
Balloon twisting gives you a great way to mix creativity, skill, and problem-solving abilities while being very useful to learn. If we look at it from a tech side, balloon twisting is one of the best things that can help the kids to have a better grip, a good hand-to-eye coordination, and a good investigation of space, these are three delicate things needed in many jobs and, of course, in our daily life, too. And in addition, the artistry of balloon twisting is everywhere, one cannot just but get carried away by the pleasure and need to solve problems as well as do good planning, because there is not a single complex design that does not require understanding of the materials and at the same time being stable. From a business perspective, balloon twisting can be a very profitable skill as the demand for such skills is high at events, parties, and promotional campaigns, therefore, allowing individuals to use their imagination to earn money. Not to mention the benefits of the craft as a your free-time friend; it has been found that balloon sculpting reduces stress and makes people more mindful. When taking over this, one not only gets a skill that is practical outright but also one that is most likely to turn good in the future while having the same time help their mental faculties and emotions.
Essential Tools for Making Balloon Animals
To make balloon animals, a balloon artist should have the necessary tools and materials that are high in quality, as well as the patience to produce professional creations that are hard-wearing. The following are the extremely necessary tools that should be included in a balloon artist’s kit.
Qualatex Balloons or Other High-Quality Balloons: The balloon itself is at the root of the balloon animal. Professional-quality balloons like those made by Qualatex are created for ruggedness, stretchiness, and bright colors. These balloons are considered to be the best, giving a slender rather than a thick look, and they come in different sizes and shapes to be suitable for different designs.
Balloon Pump: A good balloon pump is a must and it greatly assists in inflating the balloons. Manual hand pumps are easy to use and can be carried anywhere, so, at first, they are relatively suitable for beginners, but for instance, those who are professional in the field would more likely prefer electric pumps for faster and more even results, especially when a large quantity of balloon animals is to be made.
Sculpting Tools and Accessories: While it is possible to create simple designs just by twisting, more detailed creations are scarier and including a set of tools like balloon clip fasteners, deflation needles, etc., for shape manipulations or air release.
Marker Pens and Decorative Items: The use of fine-tip permanent markers is a must for putting on balloon creations those small details like eyes or patterns. It’s also possible to bring in extra materials like ribbons or stickers to create an even better-looking design if they match the theme.
Balloon Sealant (Optional): A bit of balloon sealant, which the balloons may be coated with, will prevent the quick decrease of air pressure, my otherwise due to a large balloon; so, the set up could last for an extended period of time.
A complete kit on one hand will, not only, quicken work but, most importantly, proliferate the quality in all aspects of balloon art; henceforth, we will have satisfied artists who will meet all the demands for both creative and professional works.
Getting Started with Simple Balloon Animals
Picking the Correct Balloons
The necessity of choosing the right balloons is a fundamental element of successful balloon design. Out of all balloon types, the 260Q is the most favored choice for making balloon animals due to its stretching and twisting properties that are further emphasized by its longevity and contortion-resistant characteristics. They are high-quality latex balloons with just the right combination of pliability and strength that can survive the creation process even if they are repeatedly bend and twisted. There should be a compromise in deciding on the correct size, tensile strength and the balloon material. Moreover, latex balloons are influenced because of the weather from extremes like the too hot temperature that would cause them to expand and eventually burst. One can be and very reliable in creating balloons by understanding and following these variables properly.
Proper Way of Inflating the Balloon
The proper inflation of a balloon is a very important step that guarantees the life and efficiency of the balloon for the envisaged use. Start up with selecting a proper inflation tool like a hand pump, electric inflator, or helium tank, depending on the requirement of the design. It is necessary to put the balloon’s neck over the nozzle or valve of the inflator chosen, with a thorough fittedness to avoid any air or gas passing.
It is very necessary to keep track of the amount of air or gas that is being pumped into the balloon. Overinflation might happen if the internal pressure is too high and the balloon may burst, and if overinflation is done, the balloon would look like a misshapen cabbage or be too saggy. Depending on the balloon’s manufacturer specs, the proper size for inflation can be determined and that usually guides the user to a maximum diameter or volume hint.
Are you ready to blow up the balloon without it popping? Then take it to a place with the right temperature, and use only helium. Also, be sure to fix the balloon tightly to prevent the release of helium after blowing it up. In order to have the same size of balloons every time, a sizing template or a tool which measures balloons should be employed, specifically for physical and decorative patterns that are to be repeated.
The moment we attain the desired size of the balloon, we have to make sure it is generated to perfection. This can be achieved by taking the inflated balloon out of the inflator, pinching the end to keep the air or gas inside, and then tying the end with a knot or a clip. The whole process not only guarantees the safety of the balloon but also maximizes its performance and overall aesthetics in commercial cases.
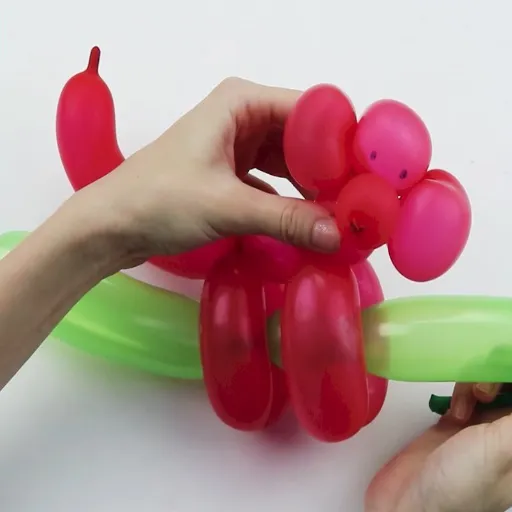
Mastering the Basic Twist Technique
Balloon artistry enlargement of the basic twist technique as the ground-breaking factor where the secure divisions are made in the same balloon to get different shapes or segments without any leakage. To do it impeccably, one must first figure out how long a segment of the balloon he wants. The other hand must be used to twist the balloon in a consistent and smooth manner while holding the balloon steadily, with one hand, where the segment is. At least three to four full turns of the balloon while twisting are recommended to keep the twist on its structure under tensile stress.
To keep the segment from coming apart, make sure the balloon is always being stretched during the process. The twist that requires structural (formal) strength has religion in the even flow and the right rotating technique. Learning the basic twisting technique will only then allow practical implementations in complex designs and hence precision and durability, which are very important for professional-grade sculpture or display made of balloons.
Step-by-Step Guide to Making Easy Balloon Animals
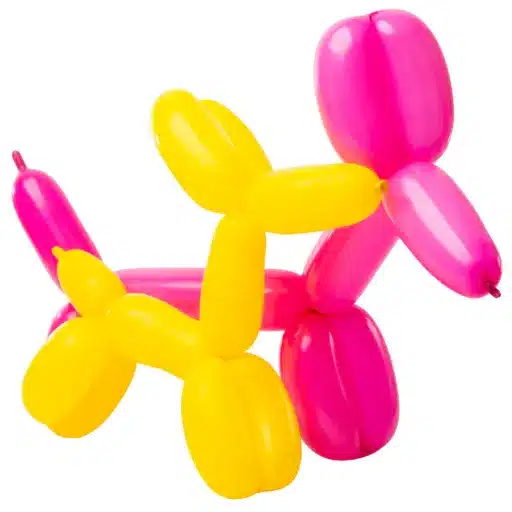
How to Make a Balloon Dog
A balloon dog is a classic balloon animal figure and is a must-have in children’s party events. It is also one of the first figures that any beginning balloon artist should learn to twist properly. Here is the step-by-step guide to executing this design quite effectively.
Inflate the Balloon:Begin by blowing up a regular balloon, making it possible to have some slack of about 4 to 6 inches at the end. This makes it possible for you to make more than one twist without the danger of the balloon bursting. Make sure you tie a really tight knot at the open end.
Create the Head and Ears:Twist the balloon at about 3-4 inches from the knot in order to shape the first segment that will represent the dog’s nose. Hold the twist well, and then mark out and twist two segments of the same length (about 2-3 inches each) to create the ears. Pinch these places together and do a lock twist to make the head and ears be there securely and in place.
Forming the Neck and Front Legs:Starting from under the head, take a small section of the balloon and twist it until you have a long neck. Do the same thing with two similar-sized sections and make the front legs about 10 cm each. Tie all the tips together for the legs to stay stable.
Create the Body and Back Legs:Next to the front legs, make the body with longer inflation (about 12 to 13 cm). Once you have done this, twist two more equal lengths of balloon (4 inches each) in order to give shape to the back legs. Apply another lock twist to hold the back legs firmly in their place.
Finalize the Design:The rest of the balloon is the tail. Slightly alter the sizes to keep the animal’s body symmetric.
Being strictly accurate in measurements and method, you can make your balloon dog look very professional. This starting pattern teaches you the important basic skills that can be developed into more intricate balloon sculptures.
Doing a Simple Balloon Swan
A simple balloon swan can be made with the use of very specific technique and proportioning skills which are crucial if an elegant and universally recognizable shape is to be achieved. In this regard, there is no such thing as a mistake of underinflation – a basic twisting balloon has to be only partially inflated and there should be a 4-5 inch long tail left uninflated to guarantee a right balance for the needed folds and twists without the need for overinflation.
Head and Neck:Create a round bubble at the end of the balloon and pinch it off – this will be the head of your swan; then, twist a long segment which will be the neck. The neck should be of a length corresponding to the graceful curvature of a swan’s neck.
Body of the Swan:Do the twist and turn of the balloon wire looping it over to get the body part of the swan and then twist it. This should be a bit bigger so that it will give the body that it is resting on. Adjust the size to maintain structural balance.
Make the tail: A tail is formed from the remaining part of the balloon. Twist the tip and gently tuck it against the body loop to finalize the swan’s silhouette. The tail’s shape should follow the swan’s natural stance as much as possible.
It is very important for the creator to pay attention to the details when making a balloon swan. Balloons twisted to the size and with the same air are among the elements that will make the swan look symmetrical. This design process not only reveals the nap of the balloon sculpturing but it will also aid you toward the most complex creations.
How to Make a Giraffe Balloon Fun
Designing a balloon giraffe requires a lot of skills and practice, all with the aim of it looking detailed and balanced. Get a fully inflated, long, twisting balloon and then, leaving a two-inch tip … it’s a small nose bubble for the head followed by two moderately larger bits for the ears. The trick is to tie these bubbles tightly so that the creature will not fall apart.
Once the head is done, proceed to create the neck with a twist of the longer, straight section of the balloon. The length of the neck should be in proportion to the size of the head and legs so that the essence of the piece is kept. Next, do the legs by twisting two similar size loops each for the front legs and the back legs. These loops should be arranged symmetrically to ensure a stable support.
Place a small bubble at the balloon’s bottom to finish the design and mimic the giraffe’s short tail. Meticulousness is vital since the lengths and bends of each part may be the ones that will influence the final appearance of the animal the most. This giraffe project is an extraordinary choice for the intermediate balloon artists as it explores a more technical side of twisting and the importance of accurate measurements first-hand and on-site.
Advanced Balloon Twisting Techniques
Mastering the Lock Twist
The lock twist is a basic technique for balloon twisting that is not only necessary but also quite important as regards to creating certain and stable designs. It requires one or more balloon segments which are made up of twists and put them closely together, so when you do that you get the segments fixed in a way without having to do anything extra. One of the steps needed to achieve a lock twist is that you need to have two bubbles that are of the same length and size formed, then using the base of the bubble get them twisted together and make a loop. The material such as twine is less supportive since the tension that is being created during the twisting is substantial and hence holds the structure. This method is very common in several designs like limbs, ears, and other symmetrical parts of an object.
When doing a lock twist, it is essential to be very precise and consistent as poor bubble sizes or tension can compromise the structure. Furthermore, mastering the lock twist eliminates some of the problems with the balloon models besides making them more desirable in terms of using and being able to retain the shape, so this technique becomes a very important one and is a must for any balloon twister of any level – be it a newbie or pro.
Exploring the Fold Twist
Another crucial method in balloon shaping, the fold twist, has been a cornerstone and an artist’s premier tool in the creation of shapes plagued with undrivable surfaces. This process begins with the balloon being folded at a particular location, and the two sections are then twisted together to make a loop—they can be used as wings, ears, or any other rounded parts. When doing the fold twist, the thing that needs to be remembered is maintaining the perfect balance and alignment at the time of folding since any misbehavior while twisting will ruin the shape and the whole model itself.
The fold twist {is an element of balloon decorations | is a folding technique by which air-filled objects may change shape} then giving innovative designs to the maker to include three-dimensional items within the least material stress. Particularly, among animal paintings, the fold twist is a common way to work on the natural look of the subject’s features (e.g., having to fold the legs or having the petals fold one on top of the other in flower designs). The folding also serves the purpose of strengthening the whole thing by reinforcing the framework through the folded parts. A comprehensive knowledge and correct use of the fold twist are indispensable for progress in the balloon art world, placing it among the most essential practices in the field of professional and hobbyist.
Combining Twists for Unique Designs
Combining twists is the art form that underlies the creation of complex and visually appealing balloon sculptures. Designers can show brilliant ideas and strong structure at the same time by using the fold twist, lock twist, and pinch twist together as one. A good example is to incorporate the lock twist and the spiral twist which is done best by an artist who can create outstanding displays through the use of colors and forms, thus making optimum use of the mixture of these techniques. The very act of knotting the lock twist with a spiral twist is a very creative act in itself that not only enhances the corkscrew pattern but also unites the two in a very dynamic manner. One of the more difficult skills a designer could acquire is the multiple twisting of pinch twists which can be very hard to detect but at the same time, can become the subtitle that makes a complete picture very lively. Expertise would not only require the designer to possess a good knowledge of the several twists but also to have the craft of turning them into a functional and beautiful whole. The association of the techniques in the composition can be considered as a mixture of utilitarian and aesthetic values. Such technique play is a window to the dynamism of the professional balloon artistry world expanding the bunch.
Tips and Tricks for Successful Balloon Animals

Common mistakes you should watch out for
As someone who’s been making balloon animals for quite a while, over-inflated balloon is what I really found to be the most common mistake of all. It’s very tempting to use the entire balloon, especially in making big and striking designs. However, if a balloon is over-inflated, it will lose its flexibility and it will pop even sooner. I choose to inflate my balloon only enough to create the fingers, then leave a gap of about 1-3 inches, depending on how detailed the design is. This way, the balloon is still big but will not pop! I also make sure that the air inside is evenly spread while I’m twisting. Because, lesser tension can be also placed near the weak points, thus not lasting long.
Another common mistake is not securing the twists properly. Personally, I find that if the twists are not locked sufficiently, then the structure can unravel, especially in multi-segment layouts. To prevent this, I check and enforce that every twist is rolled back firmly and that the ends of the balloon are fastened well with thing wraps wherever it is needed. Moreover, the surface of the balloon is being twisted across or would also lead to weak points or cracks. The balloon can be ripped from exerting too much force or making abrupt moves, so I ensure that I manage the work with great care and detail.
The final product could be so simple if you take your time to do things the right way and not so fast that you feel you have to skip a lot of steps. The best example of this is with the balloons, in that you are pre-stretching them and they still end up hard to inflate, to twist, and to manage. I usually start by lightly dusting my hands with talcum powder and that’s why I get less friction thus the balloons will be handled more easily when I create detailed designs. Once I acknowledged these popular issues in a step-by-step manner and still continued in a gentle manner, I found out that the professional and lasting results on the balloon art are not for mere luck but are rather due to my effort.
How to Make Your Balloon Animals Last Longer
In order to prolong the lifespan of my balloon animals, I take care of some very important things like material as well as inflation and the environment is a key point. The very first thing that I do is to only go for the top-grade latex balloons because these are more lasting and are less predisposed to quick decay. The bad thing with the less expensive and less quality balloons is that they will get popped or deflated more easily because of their construction being so thin. When I inflate, I am very particular about the balloon not getting filled up to the full capacity of the volume—leaving a very small “tail” of uninflated space on the end allows for the expansion to take place and also reduces the stress on the material. Moreover, I do not use those pumps or any other tools which may have sharp edges and that can easily lead to puncturing the balloon during the inflation step.
Another very important measure I take is to reduce the exposure of balloon animals to harmful environmental factors. These cute toys are very vulnerable to heat, extremely strong sunrays, and frigid temperatures, all of which may worsen the aging process. If we have to provide an example, the higher temperatures may cause latex to lose its properties and getting fragile, while on the other hand producing cold air may initiate shrinkage and deflation. If there is an option, I always ensure that balloon animals are kept and displayed in a comfortably cool, shaded, and indoor area. In addition, I tend to keep the latex off sharp objects and rough surfaces that can penetrate or tear it.
Sometimes, in the end, I might even use a specialized protectant spray for latex balloons, which adds another layer of protection and, at the same time, halts the oxidation process. It is only a small effort but prolongs the life of the balloons significantly and they continue to look stunning. By the manipulation of these factors and the use of high-quality materials and techniques carefully in handling, I have seen that animals made of balloons can stay as good as new for quite a long time. “New” here refers not to the time when the balloons are just made but a point much beyond that when they are presented to the recipients and even when they are on public display for a long period of time.
Engaging Kids with Balloon Animals at Events
You can’t go wrong if you decide to use balloon animals for interacting with children at events, as they still prove themselves to be one of the most effective and interactive forms of entertainment. From my past experience, the most important aspect of the whole process is to make the children curious and actually take it personally. Through the element of children choosing what they like the best such as their favourite animal, character or theme, I then instantly captivate them all with my very own way of making things look larger than life. Besides, adding a touch of storytelling or fun directions while making balloon shapes creates another interactive layer that will not only interest but also keep kids involved. As balloons get twisted and changed in form, kids are often sitting still and looking forward eagerly to the moment when it will become a something.
Timing and presentation have been pointed out as two significant elements contributing to engagement besides the artistic factor. If the activity is planned and carried out at the most crowded time of occurrence, a great number of participants will be involved; moreover, a cheerful attitude is an attraction for the children. The playful activities are also among the most effective ways of capturing the audience’s attention, let alone, they are liked by children the most. I sometimes have kids choose colors and hold the balloon section during the creative process . This not only entertains them but also gives them a chance for skill development, like understanding and observing cause and effect relationships and following instructions.
Finally, one should always prioritize safety. I prefer using high-grade, non-toxic balloons and not making shapes or designs with small parts that could become a choking hazard. In my experience, through one’s skills in the field, creativity, and effort towards engagement, balloon animals are proven to be the most successful way to entertain children, fuel their imagination, and improve an event’s environment.
Reference Sources
Educating Middle School Students Through the Implementation of Near Earth Aerial Tracking – Explores the use of simple party balloons in educational projects, offering a creative perspective.
Connect™ – Highlights hands-on projects involving simple designs, which could inspire creative balloon animal activities.
Frequently Asked Questions (FAQs)
Could I start balloon modelling and make a basic twist without the balloon pump?
In my opinion, it would be more productive to apply a pump and with that balloon modeling would also be favored instead of balloon modeling learning it without saving your breath and making 260 or other long balloons inflation easier when you start learning balloon modelling. Furthermore, using hand pump or electric pump will also reduce the chance of accidentally swallowing air and the same will prevent the early balloon popping by giving a steady flow. For the very first balloon work, the hand pump would be the most appropriate aid and it would be the first tool to learn to leave a 6-inch tail and tie a knot without getting dizzy. Besides, video tutorials very often show the right length of the balloon and how to hold the balloon while you twist. Another reason to have a pump is that you can have consistent balloon segments and it also makes the basic technique and step by step guide easier to follow.
Could you show me the steps of making a basic twist followed by creating two more twists to represent the dog’s ears?
In order to do a simple twist, grip the balloon close to the base and fold a 3 inch piece, and then twist that segment while still holding the balloon then twist the first and the second segments together at the same time that you are holding your balloon. To create a puppy dog is relatively simple; you go ahead and make 2 little equal segments for the ears first, then longer segments for the dog’s body and twist the ear segments to bind them. You may be making around 3-4 segments: the first pair is the front legs, the middle one is the body, and the last pair are the back legs, always twisting the balloons at the base of the neck to lock them. Beginners are usually reminded during the teaching part to keep twisting cords very close to their fingers to avoid any sorts of uncoiling or popping. It can happen that a cord will come undone and in such cases you just have to retwist the cords into a fixed position using the basic twists along the balloon to mend it.
Could a novice balloon artist learn how to make a dog with just one 260 balloon and make the first twist properly?
Yes, the standard for a “make a dog” tutorial would be a 260 balloon and you can watch a tutorial on how to make it with a single balloon by following a very simple sequence. Begin by releasing the air from the 260 in such a way that you leave a 3 inch (central figure should be 3) tail at the breached end and tie a knot so that you have a safe starting point before you do the first twist. Proceed by adjusting the air distribution and tying it in a different spot if you have a different colored balloon – it will be the eyes later. Do the first twist for the nose, then make two twists for the ears and twist them together to lock the ears in place and create dog’s ears. Next make two longer twists for the dog’s body and legs, and at last create a tail at the end if that is what you are into. There is a lot of variety for creating animals and many times the choice depends on what the animal will be used for, such as wearing it in your hair, on your arm, or on the table next to you while working. There is also a completely different Rueger, who is both technical and entertaining, and he does not create small things, just large scale characters and installations which are mostly other animals. On the other hand, if you prefer videos, you may wish to take a look at Dennis Scott’s channel as he specializes in Seraphine of Animal and Christmas shapes.
Which basic technique should I practice first to avoid balloon popping while tying balloons and to consistently make a basic twist?
Get going with the simple technique and twist basics, first on an Uninflated balloon, then on a balloon partially blown up. That way you will get the hang of the latex before you use the 260 with full inflation. Remember not to blow it up too much rather always keep some air left in the balloon so you will have material for creating segments and the balloon will not burst as frequently during twisting. Exercise dual twisting and the way of holding the balloon with both hands—grab the balloon at the base of the neck and use your fingers to help support the segments. A detailed description underlining the moments when to lock and the position of the hand lets you form muscle memory. After a few attempts, you will be able to make the first twist and also make untwisted corrections without destroying the latex.
To introduce a unicorn or parrot shape by using it as a base beginner skill, what are the two main core skills?
If I want to include a unicorn or a parrot in my beginner animals collection, I can draw a basic balloon dog first and then manipulate the segments and the twists to obtain a long neck and a swan’s beak, respectively. For a unicorn, we need to create the long neck by elongating the middle segment and also add a horn by making two little twists at the base of the neck; for a parrot, the beak can be created by forming a loop twist and also the tail feathers are going to be the 3 small segments. The first twist must be made so that it will hold the rest of the ballooning in its place, and then twist the segments together where necessary to lock each part into place. The twisting of the first would be shown in detail in many professional magic workshops as well as in beginner tutorials that one should then twist and couple the two or more together to have a stable structure. Qualatex and Betallatex balloons are a good choice for more strength and less untwisting problems with intricate shapes.
What will happen if a segment comes apart or when should I untwist and adjust the proportions of a balloon animal during practice?
If a part of the balloon got untwisted, then gently you should untwist and retwist the same part while keeping a steady hold on the base part of the balloon and at the same time keep all the other parts of the balloon as steady as possible, in order to stop them from slipping any further. Do not meddle with the knot when you fix the proportions, but instead either release it only if necessary or rectify it by twisting other parts that lie next to the affected segment and rope a 3 inch tail very tightly or use an extra small twist for the middle segment’s self-locking. If the error is even more elaborate, a step-by-step procedure manual or a video tutorial clip on the web can take you through the twisting techniques without having to give up the entire shape, and you can also blow it up to a new shape a bit by using a hand pump. While the whole process may be a little tricky, that’s why those few basic balloon handicrafts are there to provide you with the necessary skills in making 1 balloon figures, and slowly they will lead you to the art of balloon making and untwisting safely. Always make sure you leave some part of the balloon unfilled so that you can adjust the size and prevent the balloon from popping easily while you work.