The process of making balloon animals is a significant art in which the elements involved are interest and some technology engaging both children and grownups. One can be a layman looking to take the first steps or a balloon animal making pastime activity class personistry but reacquires tips on the best models and methods in the industry does help. After making such preparation, under this post we will be makıng some easy yet marvelous figures. We will further show how to make such ubiquitous models as a dog be it a balloon twisted sword or a flower. The other tools: such as the largely used elastic materials, and the instructions for a beginner each in turn are addressed. At the end of it all, one is assured of being more than ready to become elated while showing creativity aspects in any event be it a birthday party or a society event.
Introduction to Easy Balloon Animals
What are Balloon Animals?
Balloon animals are fun to make and are created by twisting together pieces of balloon animals into an animal or other recognizable design such as an object or character. These balloons are uniquely made for enhancement of outgoing designs without breaking or blistering in a relatively high pressure environment. The science of crafting animals from balloon is a blend of physics and the art of design in which tactical spinning and tautness of air are the parameters required to produce the desired work. It incorporates imagination and creativity which promotes learning and is also less boring. This kind of art is very popular in places where fun and joy are needed like kids’ birthdays parties, carnivals or even when launching colorful balloons in the sky and many other events. Through the ages, the art has polymerized and been reinvented with the introduction of new strategies and instruments which have allowed both professionals and hobbyists to try out more intricate and appealing configurations.
The Appeal of Balloon Twisting for Beginners
A blanket statement that summarizes the appeal of balloon artistry is its easy availability and that it offers a lot of convenience to the user. You do not visit an art shop with the hope of purchasing anything, and yet you can still learn a great skill while doing something you enjoy and which to some extent even gives you a sense of satisfaction. You almost certainly have at home most of the ingredients to prepare balloon figures to sell as party decorations for example, air-filled balloons and a pump. In addition, balloon twisting is not a skill that you should be afraid of learning as one can easily get how to twist the balloons with step by step training which also includes shaping of basic figures like a dog, a sword and a flower. This art form does not only allow operant training of a simple pose to be learned but also the most beneficial art training that replenishes strength and trains the mind that people can use to restore nervous systems. More so, when the training includes the hands-on experience, it is easier to remember whatever theoretical concepts had been initially given-e.g. proportion, symmetry, pressure control. In addition to tangible results, people who are new to the art however are gained by the craft by both rewards and the freedom they have to imagine.
Overview of Popular Balloon Designs
Over the years balloon designs have been simplified to counter complexities and to cater to varying skills and levels of creativeness. Most of the beginners’ sections consist of the basic shapes such as the dog, the sword and flower balloons due to the level of complexity that is minimal making it easy for such beginners to pick up. These specific shapes are not only a hit at the events but are usually the first stage in the making of bigger inflatables.
For practitioners with a little more experience, the designs that are more popular are the ones that require five or more balloons to make, e.g. sapphire dolphins, cakes, and buses. The design requires more skillful proportions and balance as well as efficient twisting to connect those extra balloons.
Balloon artists often take their art to another level, such as when they create life-sized human models, intricate table centerpieces, or inflatables that fit in a particular event. This kind of work requires much preparation, proficient shaping technique and an appreciation of balloon’s nature such as elasticity and structure.It is most always a must for the designs to stand out and at the same time offer plenty of possibilities.
Essential Techniques for Making Balloon Animals
How to Inflate the Balloon Properly
For the sake of the purpose of this calculation, a bit of work done is even more important about textual evaluation. To tone down the rhetoric involved in words, please consider a thorough reading of the following overview.
Housewives across generations have often required the help of men in the family clan to repair things that are particularly tough to repair or are expensive. Today’s society, however, respects the views of humans differently and they believe that practicality can be applicable to the repair of minor breaks in the house. Another thing maligned is the term man cave; it is used in a negative light to describe the workroom of some men.
It is a manifestation of sympathy when friends help friends, but in America, a Spirit of caring is generally conveyed through the application of practical solutions. In this regard, a very salient form of practical utilization is the wearing or carrying of durable fashionable attire. It provides a form of invisible support to the body so that each has the choice of doing a particular physical activity to him or her.
Consider additional factors that may affect the effectiveness of the current material, such as the temperature effect on the elasticity of the balloon. Regarding heat, this can lead to the balloon stretching and thus bursting much faster than cool conditions, as the materials become harder within this skeleton. Such attention to detail, including a more controlled inflation of the balloon, as well as a certain level of measuring consumer satisfaction in other sectors, readiness to continue towards some goals, communication etc is what we need to make the enterprise of crafting complicated balloon characters a success.
Basic Twists: The Foundation of Balloon Animals
Twists in balloon sculpting provide the structure in the creation of simple animal shapes because twists are needed for detailed structure and stability in the design. One of the most primary twists is the Lock Twist: the balloon segments are simply tightened and wedged in at various locations. To make a Lock Twist, make the balloon full but with space for changes, and leave a small end for construction and then join the two segments together multiple times to create a bond. Another major function is the ‘Pinch Twist’, to help in creating certain body parts of the figure such ears or legs. This actually includes catching the ends and twisting them Quite a number of times tightly and then making sure they hold their place.
Perfectly executing these basic twists sets the stage for making intricate models such as Kung Fu Panda and other worldbuilding characters in balloons. Keep in mind to what extent pressure and flexibility are used while performing each twist, or else pushing may cause the balloon to rupture, and vice versa insufficient twisting can induce deformation to the object. Having a good grip on these illuminates principles can help you craft elegant pieces without wearing yourself out.
Advanced Twisting Techniques: Lock and Fold Twists
There are two significant means utilized in order to stabilize a balloon insert: this involves variety of lock and fold twists. The lock twist is to obtain and abut two or more raised sections and to guide one seizure through the loop formed, literally positioning the system in a fixed position, so to speak. They provide an excellent solution in cases of developing erect districts or parts which exceed a certain degree challenging in the sense of disentangling them from stress forces.
Then there is the folding twist which is mostly associated with the formation of smooth embellished designs or petal like features. Here, is a necessity to fold a part of a balloon in a circular fashion and then twist it to face another part of a balloon in order to crate solid and many loop in it. Other loops such advancement in designs, flower display, inner parts of animals as well as complicated patterns are established only in the presence of both lock and fold twists. The balance and perfection of crafting these sculpts is entirely dependent upon the tension and extent to which the alignment of the parts can be done. Such mastery allows an increase in the scope as well as the intricacies of the balloon artworks, and guarantees existence of products that can stand the test of time and are still aesthetically satisfying for the eye.
Step-by-Step Guides for Popular Balloon Animals
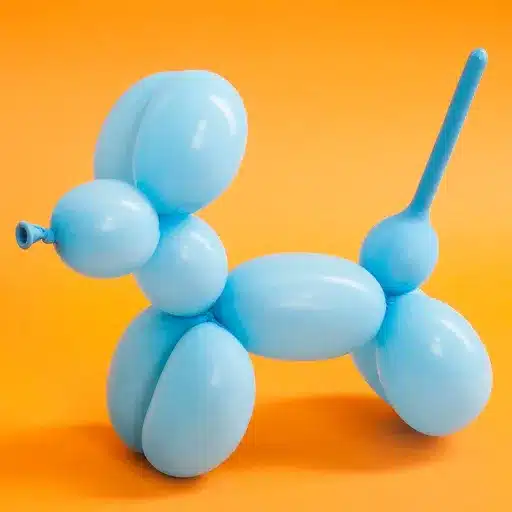
Creating a Balloon Dog: A Beginner’s Guide
All beginners are advised to develop a balloon dog due to the basic formation of the figure itself, in almost all instances it serves perfectly with a tremendous advantage for the acquisition of recent knowledge in the field of balloon art. You need a 260 balloon to get started and a pump as well.
We will start by inflating the balloon. Inflate the balloon and fill the 260 balloon but remember to leave at least 3-4 unpumped thin balloons at the edge. The flies in the ointment of having even length air-inflated balloons are that the balloons may blow up when you try to twist them. Do not fear any established screwballery of people allowing the air out – close the end tightly to hinder the air leakage during inflation.
The Head and Ears now will be created: From the end where the dog’s snout is folded, for the dogs snout, twist a roughly three inches long segment. After doing so, twist two shorter segments of not more that two inches’ width for both ears. Additionally fold the ear or twist the two smaller parts where the ear muzzles the head for more security.
Creating the Neck and Front Legs: Let’s lower the air balloon slightly, stretch the neck by 2-3 inches, then bind two equal segments of 3 inches for front legs. Fold the same way as we did with the ears and without breaking the structure assemble the front legs in front of you which consist of two segments connected together.
Making the Body and Uniting the Rear Legs: Getting a hold of about 4-5 inch segment of the balloon at its container pierce it to attain the trunk of the dog. After getting the trunk as described above obtain two more 3 inch segments and two more front legs. Lock down these twists by using another technique discussed earlier in order to create the back legs ensuring it is correctly placed.
Last Minute Touches: Attempt to restore the surface of the balloon at its original smoothness and as you do so authenticate the affixed twists which could slip due to pressure. The muzzle is often substituted with a triangle or similar shape and the degenerate part forming the end of the balloon is used as tail which brings a close presentation of a pioneer balloon-decorating technique.
There is a deep well of artistry such as this within our society. Artists need to harness this ability to feel more assured in their craft and develop further skills pertaining to intricate complexity. When twisting, quality work necessitates strict adherence to details – accurate measurement, attention to detail and controlled sculpting will ensure a perfect balloon canine in no time.
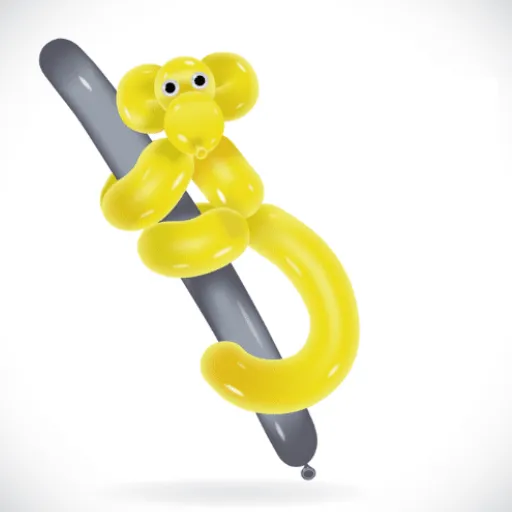
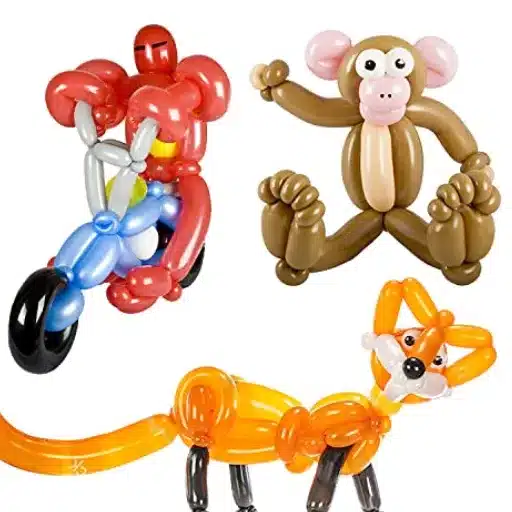
Making an Easy Balloon Monkey
Assembling a balloon monkey, a minor sculpture of a deformed ape, requires a series of proper folds, and twists in order to create the defined basic parts. Inflate a standard twisting balloon about the size of a primary tape ball, and leave some space at the end – in this case 6 inches – that can be adjusted. Create the head of the monkey first, by pinching a ball for the nose, two more balls for the ears, each slightly bigger than the one above it and then connecting the three twisted bubbles. Also known as “neck” the next part is made by pinching the length of the balloon once to create a meet point with two similar size bubbles which goes off to create the two arms of the ape.
Make the body longer. Works to form a large bubble in the bottom and then twist two identical lengths against the first for the balance. Inflate in the tail while the other part remains not inflated. You can also add some more details and curl the tail round slightly to represent the monkey’s curled tail. The balloon design concentrates on the details of joints maintenance: how to make exactly the same body parts and which detailed proportions to stick to. How to do the right proportions and stretch in each twist is very important for the working process. The design of this balloon figure shows techniques of an intermediate effort level and is perfect for impr oving knowledge and practice in professional craftsmanship.
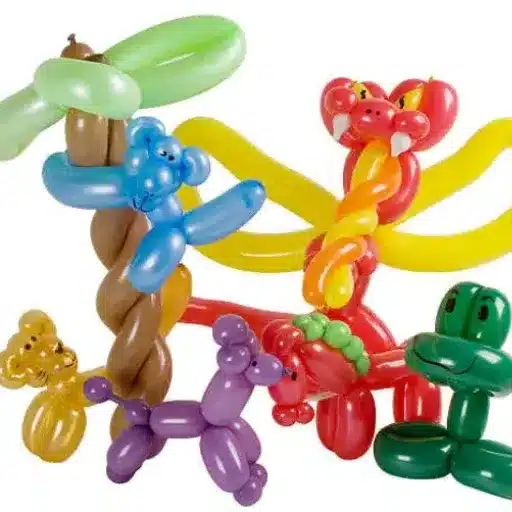
Designing a Balloon Swan for Beginners
To create a lovely swan out of simple balloons, you will need an ordinary long balloon preferably one that is white as this represents a swan naturally. Inflate the balloon, but don’t inflate it completely, reserve about 4 inches on one side of the balloon for twisting to create the swan. The first thing you can do is make a small loop of a certain size near the nozzle which will represent the swan’s head. Make the pieces too small and the base will be too weak imbalanced.
After that make gentle twists in the upper part of the balloon, reducing its length to approximately two-thirds this part of the whole size so as to make the curvature of the neck of the swan. This step requires the utmost care to make it possible to make the rounded bend which is typical of the swan neck. When the neck is done, complete the body using the remaining part of the balloon where again a little bigger loop or a fold is created but not the end of the balloon is inflated to show the tail feathers of the swan.
As we approach and then descend from higher levels, the fact that we start with that application of effort is particularly significant in the sense that it is a patterned direction of behavior. You will be expected to describe how the ideology of subordination has to take into account even and odd numbers of embeddings, as well as which their formation can be made without the ideology of hierarchization.
Adding Creative Touches to Your Balloon Animals

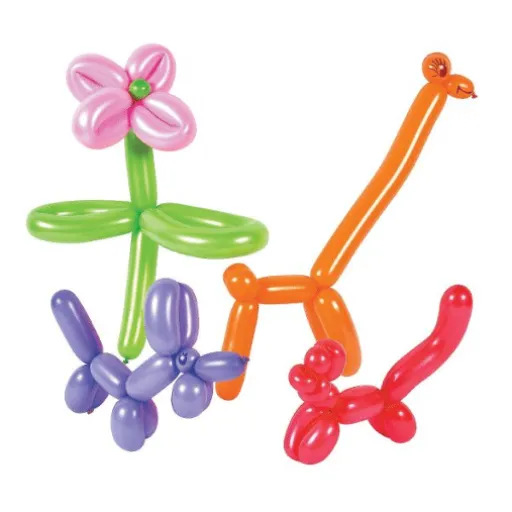
How to Make Balloon Flowers
Fabricating sculptural forms with balloons is an innovative and rather breathtakingly creative way of expressing imagination through the air. To make a basic balloon flower, pick a 260Q balloon of a color for the petals. Inflate the balloon yet leave a 2 in pale tail for ease of turning. Knot the balloon into a ring and twists it in six identical parts. These rollers will be the petaled edges.
Then use a green 260Q to form the parents and stem. Inflate the balloon completely and then release a bit of air before it spins to make it slightly more flexible when tying. Twist the end with a few fingers inward and tie it in the middle this is called the pinch twist. Insert the stem of the flower into the assembled petals. Using green balloons, cut and sculpt the leaves by gathering the 260Q from the tip of its decorative white in ridges and small twists secure elasticity at the end of the balloon.
In this particular activity, creation of a balloon flower teaches one how to master several core components including proportion of the body, position, and effective balance. To enhance the skills, one can try making colored balloons and designs catering to different sized pentagons, hexagons and star flowers rather than the generic flowers thus having the attention on the simplicity to complex decorations within the same design. This activity is quite rewarding, especially for those who have a lack of creativity in making their art out of balloons, and hence this is effective.
Designing Balloon Hats for Special Occasions
Balloon hats are highly impressive and noteworthy things at events- they are technically complex and demonstrate excellent creativity. Building a balloon hat starts with taking measurements that will enable a perfect fit when worn. The basic structure of a hat usually includes connected twisted shapes, whose inflation gives more stability and makes it easier to add decorative parts later on. Different kinds of inflated flowers make it easy to create truly interesting and even difficult shapes and patterns.
Ensure that the selection of colors and patterns reflects the event, whether one of the marriage, birthday or a corporate affair. Thanks to these, it is possible to create complex decorations, for example, the patterns that look like flowers, the mesh of spirals, or the replicas of the decorations. Adding LED lights and other fancy details to the hat will help make the hat more noticeable and, as a result, make it the focusing point of the celebration. For these reasons the hat’s practicality and wearability must also be addressed. To maintain its quality during use without sacrificing comfort of the wear are the main challenges addressed after giving the cosmetics compliment. Through these fine techniques, it is possible to create a spectacular thematic decor of unusual form with the help of a balloon sculptor.
Incorporating Color and Patterns in Balloon Designs
Once you decide to follow balloon art, be ready for colors and patterns because they are loud and even louder. The color scheme in a particular decoration should be in line with the occasion. For instance, shades of pastel for a baby shower, because they are mellow; therefore, they have a calming effect. On the contrary, loud colours such as burning pink and sunflower yellow are too crazy to attend a rescue operation they are more suitable for a birthday function or a day when one isn’t expected to be calm.
Textures like polka dots, stripes and some unique patterns can serve as ‘action points’ that liven up the design as well. Yet again, in terms of the numerous design patterns one needs to include for the specific design, one has to be very drastic regarding the same to avoid what is commonly referred to as visual stress. It is the clever placement of these or even tint on the same colors or very closely related ones which results in the simple and lively appeal of lemonade stand aesthetics. As a rule, any balloon décor would be improved by the utilization of such details as the addition of reflective Aluminuim/Mylar and Chome balloons, providing a focal and stylish accent to the design. By understanding the principles of color theory and design, the quality of work of a balloon artist is enhanced to the extent that his or her work is of significance and with lasting impact to a viewer.
Resources for Learning Balloon Twisting
YouTube Channels for Beginner Balloon Twisting
During my pursuits in the art of balloon shapes, I established that YouTube was an excellent tool for gathering the basics and more. A great channel that is perfect for beginners is Balloon Sage. This is an instructional resource with a wide collection of beginner-level tutorials that are clear, step-by-step, and easy to follow for anyone who wants to learn. It goes beyond the simple balloon animals such as dogs and lions—these are the only lessons they offer, they also emphasize direct teaching of basics which helps in faster establishment of other lessons.
Also of interest is Bryan Asquith at the famous party. His classes are convoluted, concentrating on elementary models but are good for new sculptors ensuring that they make interesting models. One thing I found fascinating is that he cannot underscore enough the aspect of stress or how to handle a balloon in order to prevent burst – a common worry for most newbies.
In conclusion, for those who want to challenge themselves beyond the basic stuff, the twisted sister is the in-thing. Most of her tutorials are available to a number of professionals but there is a special playlist that is designated for the novices. The manner in which she teaches is easy to grasp but each step is thoroughly explained. She is also known for giving advice on the materials used and twisting methods, which is needed at the beginning in order to start the grade. She has helped me to enhance my abilities largely and finally peruse more intricate styles thanks to these.
Online Courses and Tutorials on Balloon Animal Making
In my quest to improve my craft of creating balloon animals, I took to the web and found courses and tutorials. Video-sharing sites such as Youtube and e-learning platforms such as Coursera and Behance collect and organize classes formulated and taught by professional balloon masters which differs in difficulty multiple times. Udemy, a great example of such platforms, has a bunch of classes that suit a novice beginner like myself in basic manipulations unlike the other that grow into complex creations such as multi-balloon animals and structures. Although apart from beginner levels of courses, these lessons are designed in such a way that they can be learned in order or chapters at your discretion. I can complete my self study of spiral balloon sculpture, taking advantage of the monetary value, regardless of location of these courses within the country or abroad.
In much the same way, it can be said that modern technologies have made it possible for people to learn how to do things without attending classes. There are specific channels like Balloon Artworks and Michael Floyd’s Balloon Academy which contain lots of videos with tutorials for people who know nothing about balloon art as well as complicated designs for professionals. YouTube’s good aspect is the different teachers who have their unique way of teaching or giving advice. Some of them for instance tend to teach show performance, their balloon animals entertainment performer styling others more display custom technical work. The possibility to press the mechanical keys, see any particular part and even run detailed elucidation helps me understand more of each process.
Conclusively, the combination of bounded online courses and a mix of videos has also been effective in acquiring both basic and acute skills. I have yet to use most of these resources but I have to admit that spending some time with them has improved my technique and appreciation of the balloon twisting craft.
Community Forums for Balloon Twisters
Engaging in community forums has played a crucial developmental role in my balloon twisting skills. Not only do these forums become hot centres of collaboration and creation but also busy nooks where newbies and veterans can share knowledge, skills and ideas. Big websites such as BalloonHQ and face books particular groups are full of discussions visited every day and covering topics like entry level twisting to as advanced as placing together a number of balloons for a figure. And for this matter, the professionals also cover steps in a client relationship, pricing and event organization which gives different perspectives on engaging in the balloon twisting other than just fashioning the art pieces only.
What’s truly compelling about such online platforms is that one gets the chance to get in touch with people who have been in the industry for long and who are able to provide guidance. Such people are the ones in charge of the tutorials, criticism, as well as bulletins, on the most recent developments that are taking place in the balloon decoration industry. There was also much to gain in time-consuming projects such as inflating in an artful way, Using Statements for what materials to work with and most importantly creating designs which are efficient at high volume in an event. In this sense, the ability to ask direct questions and receive prompt influential responses has been particularly useful and quite resourceful in my quest to improve when it comes to practical aspects of my work.
In general, online forums are not only significant educational platforms – they are also imaginative and interacting networks for twisting balloon people. It is imperative for me to also try and give back by sharing knowledge, experiences and learning in the joint endeavors with others in the group which strengthens most part of me the skills and the connection to the warmth of the community.
Reference Sources
- Balloons: A Holistic Unit – Discusses creative uses of balloons in educational and design contexts.
- Design and Development of an Interactive Materials-Based Learning Kit for K-4 Grade Levels – Explores design tools and activities, potentially including balloon-based projects.
- Designing and Prototyping Networked Collaborative Play Structures – Includes concepts related to balloon use in interactive designs.