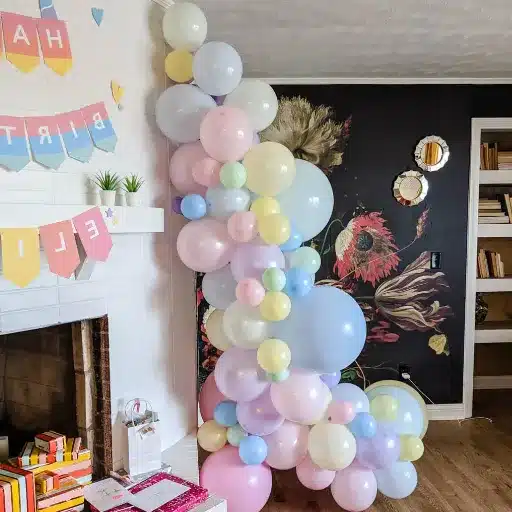
Whether you’re entertaining kids at a birthday party or need a new hobby, learning how to make balloon animals starts with mastering the art of blowing up a modeling balloon. This blog post shows you some of the most essential techniques to start confidently. In no time, you will learn to unleash your imagination, beginning the journey towards eye-catching balloon masterpieces! Prepare to dazzle yourself and others with this exciting new skill, which, as we all know, is sure to bring joy to people of all ages.
What is a Modelling Balloon?
A crafting balloon is a long, flexible balloon specifically designed for shaping into various figures and designs, like animals, hats,or flowers. Made of durable latex, these balloons are designed to withstand twisting and bending without popping. Available in a variety of sizes and colors, they are perfect for creative balloon art.
Understanding the Modelling Balloon in Detail
Modelling balloons are made of high-quality latex, which is elastic and strong, so they can withstand a lot of twisting and turning. The most common size is 260Q (with a diameter of about 2 inches, length of roughly 60 inches when fully inflated), but there is also 160Q for finer designs and 360Q for larger designs. The “Q” in these sizes refers to the brand Qualatex, a renowned manufacturer of modeling balloons, adds, and boasts rivals of ballooning companies like Smithers PIRA.
One critical concern when it comes to working with modeling balloons is inflation. Most recent studies suggest that manually inflating a balloon or using an electric pump greatly limits the chances of overinflation, which can lead to popping. Pre-stretching also helps enhance gasability. Generally, balloons have to be inflated to nearly 85-90% of their full gasability to ensure that there is adequate room and pressure isn’t applied during twisting and turning.
An astonishing piece of information is that the market for balloon art has significantly advanced in the past five years, with the estimated annual value going over $600 million in 2023, according to the sources. This signals that more people are keen on balloon art for entertainment during parties, events, and even professional acts.
Knowing how to work with and care for these balloons enables one to create more intricate designs and ensures they last longer. Things such as the temperature of the room and humidity can affect the stretchability of latex balloons, so it is best to work in a calm environment. With some practice, care, and creativity, modeling balloons can be turned into wonderful creations that enchant any audience!
Difference Between a Long Balloon and Regular Balloons
|
Key Point |
Long Balloons (Modelling Balloons) |
Regular Balloons (Round Balloons) |
|---|---|---|
|
Shape |
Long and thin |
Round or teardrop |
|
Material |
Latex |
Latex |
|
Size Measurement |
Diameter and length (e.g., 260) |
Diameter (e.g., 12 inches) |
|
Primary Use |
Balloon animals, decorations |
General party decor |
|
Flexibility |
High, for twisting |
Moderate |
|
Durability |
Similar to regular balloons |
Similar to long balloons |
|
Common Sizes |
160, 260, 360, 660 |
5-36 inches |
|
Biodegradability |
Biodegradable |
Biodegradable |
|
Inflation Method |
Hand pump preferred |
Mouth or pump |
|
Popularity |
Niche (artists, events) |
Universal |
Choosing the Right Balloon for Modelling
When purchasing modeling balloons, selecting high-grade, long-lasting latex balloons made for twisting and turning, such as the 260Q and 160Q, is best. These balloons are best because they are easy to work with, strong, and brightly colored, making them ideal for detailed designs.
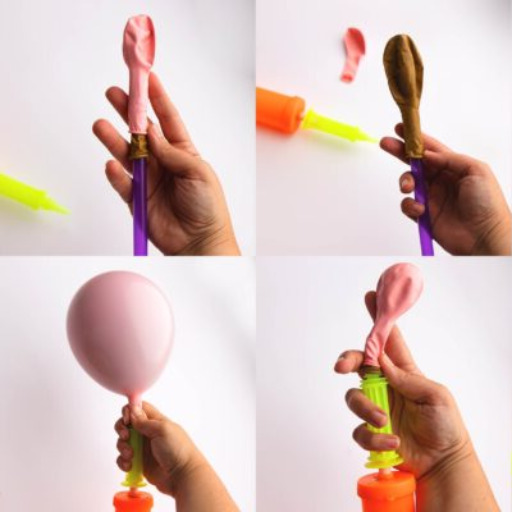
How to Blow up a Modeling Balloon?
To inflate a modeling balloon, do the following:
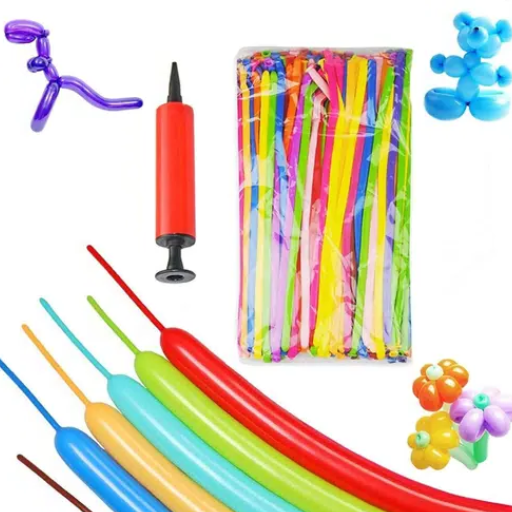
- Use a Balloon Pump: Always use a proper balloon pump when inflating modeling balloons because they are pretty tricky to blow up. The best choice is either a hand pump or an electric pump made for balloons.
- Position the Balloon: Ensure that the open end of the balloon is securely positioned over the pump’s nozzle. The balloon should fit tightly.
- Inflate the Balloon: While holding the balloon, steadily and slowly pump air into it. When the balloon reaches the desired length, stop inflating while leaving about an inch of the balloon uninflated at the end so twisting is possible.
- Tie the Balloon: Remove the balloon from the pump, pinch the open end to keep the air from escaping, and tie it so that it is securely tightened.
This technique provides safe and effective balloon inflation and prepares it for easy shaping.
Using a Balloon Pump vs. Mouth Inflate
When considering using a mouth to inflate a balloon versus a balloon pump, there are factors to keep in mind. These are five of the main points highlighting each method.
- Efficiency
- Balloon Pump: With the help of a balloon pump, a single person can inflate more balloons quickly. This is important in big-scale works like parties, events etc
- Mouth Inflate: Inflating through the mouth is mundane and exhausting if the individual has to deal with many balloons.
- Health and Safety
- Balloon Pump: With a pump, there are fewer chances of a person getting dizzy, overexerting themselves, or inhaling harmful particles that are stuck on the balloon’s material.
- Mouth Inflate: One of the worst ways to blow up balloons is through mouth inflation. There is always a risk of getting lightheaded, and this is not suitable for people with breathing problems.
- Precision
- Balloon Pump: Using a pump is less stressful because you are putting in controlled amounts of air, which will prevent overfilling the balloon and bursting it.
- Mouth Inflate: It is much harder to control the amount of air going into balloons by mouth, so there is a lot of overinflation.
- Convenience
- Balloon Pump: Manual or Electric pumps make the task easier and are portable.
- Mouth Inflate: It does not require any equipment, which is why it is less practical.
- Expenses
- Balloon Pump: A balloon pump requires an upfront investment but becomes economical over time with repeated use.
- Mouth Inflate: Lacking any financial requirements, this method is accessible to everyone, making it perfect for infrequent use.
In the end, using a balloon pump or inflating it through the mouth depends heavily on the situation, one’s individual tastes, and health concerns. A good-quality balloon pump is often the best option for large-scale projects or high-frequency tasks.
Step-by-Step Guide to Inflate the Balloon by Mouth
|
Step Number |
Key Action |
Description (Max 10 Words) |
|---|---|---|
|
1 |
Stretch the balloon |
Loosen the latex by stretching in all directions. |
|
2 |
Pinch the neck |
Hold neck with thumb and forefinger. |
|
3 |
Take a deep breath |
Prepare lungs for steady airflow. |
|
4 |
Seal lips on the balloon opening |
Create a tight seal for air transfer. |
|
5 |
Blow steadily |
Inflate with consistent, steady breaths. |
|
6 |
Overcome initial resistance |
The first blow is most brutal; keep blowing. |
|
7 |
Pinch to pause |
Hold the neck to prevent air from escaping. |
|
8 |
Stop before overinflation |
Avoid popping by stopping at the resistance. |
|
9 |
Tie the balloon |
Secure the air by knotting the neck. |
Common Mistakes When Trying to Inflate a Balloon
|
Mistake |
Description (Max 10 Words) |
|---|---|
|
Overinflation |
Balloon pops due to excessive air or gas. |
|
Skipping stretching |
Unstretched balloons are harder to inflate. |
|
Wrong nozzle use |
Damages the valve or makes inflation difficult. |
|
Inflating too quickly |
Causes uneven pressure and potential popping. |
|
Not sealing properly |
Air escapes due to poor knot or valve closure. |
|
Using damaged balloons |
Holes or weak spots lead to deflation. |
|
Ignoring temperature |
Heat or cold affects balloon elasticity. |
|
Improper technique |
Using cheeks instead of the diaphragm for airflow. |
|
Filling with wrong gas |
Incorrect gas affects buoyancy and durability. |
|
Inflating folded balloons |
Creases cause uneven inflation or tearing. |
How to Tie a Knot in the Balloon?

To tie a knot in the balloon, complete the following steps:
- Balloon knotting neck step one begins with holding the neck of the balloon with one hand while keeping the air contained within the balloon.
- Now, take the other hand and stretch the neck of the balloon to provide sufficient length for a tie.
- Bend the elongated balloon neck for a complete circle and secure it using the index and middle fingers.
- Tether the neck’s end within the circle fashioned in step 3.
- Ultimately, the knot can be secured tightly to prevent air leakage.
Securing the End of the Balloon
Ensure that the end of a balloon is tied accurately to prevent air or helium from escaping, especially when it comes to events or decorations. Here are the Equip tips with additional insights to seal the deal:
- Use a Double Knot for Extra Guarantee
Most balloons, particularly helium-filled latex balloons, tend to leak easily. This makes additional security measures more necessary, especially if the balloon is filled with helium, which can last up to 12-20 hours, depending on size and material. Consider tying an additional knot on top of the first to resolve this issue.
- Employ Balloon Clips/Sealing Devices
Industry data states that balloon clips are 95% more efficient at retaining air pressure than manually tying the clip. For large-scale events where efficiency is of key importance, this can lead to time savings. Balloon clips are adjustable, can be reused, and are specially tailored to the neck of the balloon, making them ideal for inflating multiple balloons swiftly.
- Reinforce with Ribbons or String
Ribbons and strings not only provide decoration but also offer additional reinforcement by fastening the knot. This helps extend the life of the balloon and provides more longevity.
- Consider Hi-Float for Helium Balloons
Applying Hi-Float, a coating that covers the interior of helium-filled balloons, can significantly increase float time. Research shows this treatment has the potential to boost float durability by 2-3 times, making it ideal for long-lasting, everlasting displays at events.
Proper tying techniques, such as Hi-Float and balloon clips, will guarantee that the balloons remain inflated throughout the celebration and that the decorations stay intact for the duration of the event.
Techniques for a Tight and Secure Knot
Inflated balloons must be securely knotted to prevent deflation; thus, ensuring they last throughout your event. Here are five tips to retain the perfect balloon knot:
- Standard Overhand Knot
The overhand knot is the most widely accepted balloon knot. This is also a starting point to many other more complex knots. To do this, you must pinch the neck of the balloon, then wrap it around two fingers. Finally, you pull the end through the loop to get a firm (but not too firm) and stable knot.
- Double Knot Method
Add another overhand knot after securing the first knot for additional security. This is especially beneficial with larger balloons or helium-filled designs, as they tend to put more strain on the knot.
- Slipknot for Quick Adjustments
Knots can be left partially untied while still being attached. Although slipknots aren’t as secure as double knots, they are greatly beneficial when making temporary balloons, garlands, and arches that require repositioning.
- Using a Balloon Tying Tool
A balloon tying tool greatly simplifies the process and reduces strain on your index fingers. Position the balloon neck into the tool, then follow the steps to twist and tie it. The knot will be tight effortlessly every time.
- Twist-and-Tuck Method
For thicker materials like foil balloons, utilize the twist-and-tuck method. This technique involves twisting the balloon’s neck multiple times and tucking it under a clip or securely wrapping it into a spiral to prevent air from escaping.
These techniques are easy to learn, and they will enable you to construct balloon decorations that are elegant and strong enough to endure any celebration.
Preventing Air Leaks After Tying
To prevent air leaks after tying, it is best to ensure that the knot is secured tightly and a clip or tape is placed for added hold if needed. With foil balloons, I twist the neck to form and seal it properly with the self-sealing valve or a clip. These small measures result in the balloons remaining inflated longer, which helps enhance their perfection for any occasion.
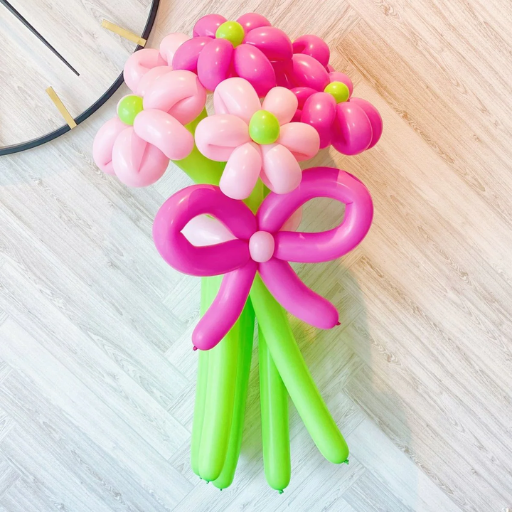
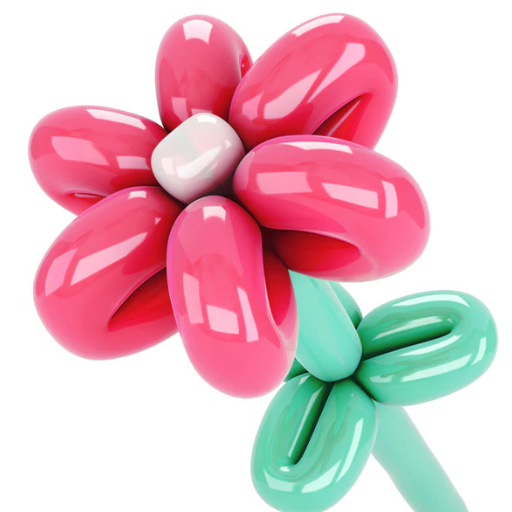
How to Twist Balloons for Designs?
First, to twist balloons for designs, remember to inflate the balloon while keeping the tip one inch inflated, as the person twisting needs room for rotation. Do remember to hold the balloon gently to avoid popping it. It is crucial to spot the area that needs twisting and create the first twist by pinching the balloon and rotating it several times in that same direction. Continue holding the twists with varying degrees of pressure to ensure security and endlessly add more make refinements if needed. For complex designs, follow through with step-by-step guides, further practice basic shapes like flowers or animals before graduating to less intricate patterns. Balloons of dull quality will provide poor durability and flexibility and become harder to twist, so always remember to use high-quality balloons.
Basic Twist Balloon Techniques
|
Technique Name |
Description (Max 10 Words) |
|---|---|
|
Basic Twist |
Twist the balloon to create a single bubble. |
|
Lock Twist |
Lock two bubbles together for stability. |
|
Pinch Twist |
Create a small bubble and twist it into itself. |
|
Loop Twist |
Form a loop by twisting the balloon ends together. |
|
Tulip Twist |
Push the knot inside the balloon and twist to secure. |
|
Fold Twist |
Fold the balloon and twist to form shapes. |
|
Air Pressure Control |
Adjust the air for the desired shape and flexibility. |
|
Knots |
Securely tie balloon ends to prevent air escape. |
|
Curve Technique |
Bend and twist the balloon to create curves. |
|
Angle Twist |
Fold and twist to create sharp angles. |
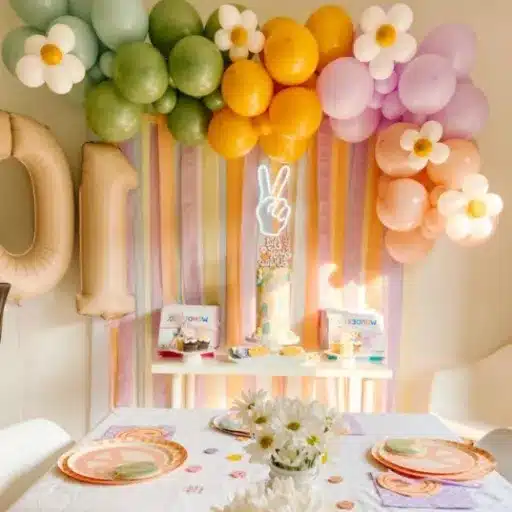
Step-by-Step Guide to Creating Simple Balloon Animals
Balloons are not only a source of joy but can also bring out a person’s creative side. Making balloon animals is one of the simplest and most loved activities, especially for kids. Keep reading if you want thrilling yet simple steps to make a balloon dog or a balloon sword!
- Balloon Dog
The balloon dog is by far the easiest and the most recognized among kids. With just a few steps, you can easily master making a balloon dog caricature.
Step 1: Begin from the bottom and gently inflate the balloon, leaving a three-inch uninflated tail at the end.
Step 2: Gently twist the remaining uninflated end into a balloon nose. Make the twist roughly three inches above the knot.
Step 3: Form the ears by creating the equivalent of a five-inch section, then lock the creations by twisting them together.
Step 4: To make the neck, pinch and twist a roughly three-inch section from the middle.
Step 5: Leaving some space for the torso, split the leftover balloon into two halves, and twist them into the back legs.
- Balloon Sword
As mentioned before, this design is extremely easy, and it encourages even the most novice to give it a try!
Step 1: Inflate the balloon, be gentle at the end, and leave a small amount of air to encourage flexibility.
Step 2: Create the hilt by folding a 6—to 8-inch portion of the balloon to itself and twisting it.
Step 3: The blade can be made longer or shorter to fit preference.
- The Balloon Butterfly:
A bit more advanced, but still achievable by beginners with some practice.
Step 1: Inflate two balloons and ensure they have 2 to 3 inches on each side that remains uninflated.
Step 2: Tie the balloons together and twist them, forming three loops representing the butterfly’s wings.
Step 3: The butterfly’s body can be formed using a smaller balloon, which can then be attached to the wings with some twisting.
Tips and Data for Balloon Twisting:
- Experts specializing in balloon twisting recommend using Qualatex balloons for their durability and unrivaled elasticity.
- Twisting balloons typically fall into the size 260 category, which has a 2-inch diameter and is 60 inches long.
- Like with any other skill, practice is critical—experts recommend setting aside a minimum of 15 minutes daily to enhance these skills.
- With practice, most simple designs like balloon dogs or swords can be made in under 3 minutes.
Starting with such simple designs allows you to develop the skills for intricate and complex balloon sculptures slowly. Twisting balloons is a fun and rewarding craft to dedicate your creative energy to.
Avoiding Pops When You Twist
To ensure that your balloon creations do not get damaged and to minimize any unexpected pops, it is essential to follow these practical tips:
- Picks Sturdier Balloons for Twisting
Cheap, low-grade popping balloons will easily break because of the uneven material or thickness of the balloon. Aim for brands specially made for balloon twisting as they are of higher quality.
- Do Not Inflate the Balloon Entirely
When twisting the balloon, remember to leave some space at the tail end to prevent it from being overly inflated.
- Stretch Balloons Before Inflating
Stretching or rubbing the balloons slightly before blowing air into them usually helps. Balloons that have been warmed up or stretched are less likely to break.
- Make Sure Nails and Jewelry Are Not Sharp
Sharp edges, such as rings, scissors, watches, and other fingernail paraphernalia, are a recipe for disaster for balloons. Make sure you have smooth hands and no sharp jewelry when twisting.
- Twist with Light Pressure
Applying too much pressure or being overly aggressive while twisting may weaken the balloon, increasing the chances of it bursting. Use smooth and slow motions for the best results.
Additionally, these tips will not eliminate popping entirely, but sticking to the guidelines will, in fact, result in easier balloon twisting encounters.
What Tools Help with Balloon Inflation and Twisting?
Having the right tools can enhance the enjoyment and efficiency of balloon twisting and inflation. Here are some tools you cannot do without:
- Hand Pump: A good hand pump allows one to inflate balloons precisely and quickly without straining one’s lungs. It is essential for precision work and helps avoid overinflation.
- Electric Balloon Pump: This tool comes in handy when filling multiple balloons at once. It is perfect for busy events and complex designs.
- Balloon Sizer: This tool guarantees that balloons are inflated to the same size, which is critical during advanced twisting projects.
- Balloon Apron or Belt: This item enhances accessibility and organization while keeping balloons tidy.
These pieces of equipment offer exceptional practical benefits for both beginners and pros because of their simplicity.
Choosing the Right Balloon Pump
I decide when choosing the right balloon pump by focusing on the type of project I work on most frequently. I prefer a manual hand pump for smaller projects due to its portability and ease of use. I like using an electric pump for larger events or more complex designs as it saves me a lot of time and effort. The key is finding a pump that works with speed, efficiency, and portability for my personal goals.
Using a Nozzle for Easy Inflation
Attaching a nozzle to the inflating mechanism of a balloon can ease and elevate the entire operation. Each balloon size and inflation requirement has its own specialized nozzle. Three examples of commonly used nozzles along with their corresponding features are listed below:
- Standard Nozzle
- It best fits the general use of regular latex balloons.
- A snug fit is provided to prevent exhaled air from escaping through the opening when inflating.
- Comes standard with the majority of balloon pumps.
- Dual-Size Nozzle
- Works best for both large and small balloons.
- Molded on one side also accommodates larger balloons, and smaller balloons on the other.
- Best choice for numerous undertakings.
- Precision Tip Nozzle
- Designed for specialized balloons such as twisting balloons (balloon art).
- Allows airflow to be controlled for better precision when inflating a balloon.
- There is less chance of over-inflating, while the chances of bursting are greatly reduced.
- Foil Balloon Nozzle
- Used on foil balloons.
- Allows secure fastening without damaging the self-sealing valve.
- Mostly goes with electric balloon pumps.
- Multi-Port Nozzle
- Inflation of several balloons can be done at once.
- Ideal for bulk balloon décor arrangements or events.
- Allows for increased efficiency during large-scale projects.
Using the right nozzle allows for faster inflation of one or more balloons without causing damage to them.
Essential Tips for Balloon Modelling
|
Tip |
Description (Max 10 Words) |
|---|---|
|
Use Quality Balloons |
Prevent popping with durable brands like Qualatex. |
|
Leave a Tail |
Leave 2-4 inches uninflated for twisting space. |
|
Master Basic Twists |
Learn basic, lock, and pinch twists first. |
|
Use a Balloon Pump |
Avoid exhaustion; pumps inflate balloons easily. |
|
Practice Tying Knots |
Secure knots prevent air from escaping. |
|
Control Air Pressure |
Adjust air for flexibility and shape retention. |
|
Stretch Balloons First |
Loosen latex to make twisting easier. |
|
Start with Simple Shapes |
Begin with dogs, swords, or flowers. |
|
Avoid Overinflation |
Prevent popping by not overfilling balloons. |
|
Experiment with Colors |
Use contrasting colors for creative designs. |
References
-
Northern Illinois University – Huskie Commons
Ballooning across the curriculum
This source discusses the science behind balloon expansion and includes educational applications. -
Academia.edu
Strengthening Balloon Programs: University and Business Collaborations
This paper explores the implementation and benefits of balloon programs, including technical insights. -
California State University, San Bernardino – ScholarWorks
Using hot air balloons to boost middle school students’ understanding of the mole concept
This study uses balloons to explain scientific concepts, providing a detailed analysis of balloon behavior.
Frequently Asked Questions (FAQ)
Q: What is the best way to learn how to blow up a modelling balloon?
A: The best way to start is by using a tutorial, which offers step-by-step instructions. Begin by learning how to hold the balloon properly and how to fill it correctly.
Q: How do you blow up a balloon using your mouth?
A: To blow up a balloon using your mouth, first inflate the balloon by holding the neck firmly with one hand. Then, take a deep breath and use the air from your lungs to blow air into the balloon. It’s essential to keep blowing steadily to ensure the balloon inflates properly.
Q: Why is it almost impossible to blow up a balloon sometimes?
A: It can be almost impossible to blow up a balloon if the balloon’s material is too tight or not properly stretched. Stretch the balloon before inflating to make it easier.
Q: How do I use a hand pump to inflate a balloon?
A: To use a hand pump, place the mouth of the balloon over the pump’s valve. Hold the balloon with one hand, and use your free hand to operate the pump, filling it gently until it reaches the desired size.
Q: What is the balloon mouth in the context of inflating balloons?
A: The balloon mouth refers to the opening or neck of the balloon where you insert air, either by using your mouth or a pump, to inflate the balloon.
Q: How do I prevent the balloon from slipping out of my hands while inflating?
A: Pinch the neck of the balloon firmly between your thumb and forefinger. This grip will help maintain control as you blow air into the balloon or use a pump.
Q: What type of balloon is best for making balloon animals?
A: A 260 balloon, a type of skinny balloon, is commonly used to make balloon animals. Brands like Qualatex are popular due to their durability and ease of use.
Q: What is the balloon’s “tail” purpose when making balloon animals?
A: The balloon’s “tail” is the uninflated portion at the end of the balloon. It allows room for air to move as you twist and shape the balloon into various animal forms.
Q: Can I inflate modeling balloons with a hot air balloon pump?
A: A hot air balloon pump is unsuitable for inflating small modelling balloons. Use a hand pump or your mouth for this task.
Q: What is a good way to practice inflating balloons?
A: A good way to practice is by consistently inflating balloons using your mouth and a pump. This will help you gain control and understand the correct pressure to inflate balloons without popping them.